Category Archives: collage

Mixed Media Techniques on Blotter Paper

Standard
Mixed Media Techniques on Blotter Paper

Hey friends, what’s going on today?  Well…..

… I thought I would take my under paper (blotter) on my art table and take it to the next level with more layers of paint.  I’ll show you how I use texture paste on art tissue paper and use those torn pieces as collage fodder. Finally, I show you how I put an image transfer on the piece.


I really hope you enjoy that and share with others.  Please subscribe, click the thumbs up and share if you liked it.

I’ll be back soon with more.

Thanks for your comments; I just love hearing from you.

Judy  

Angel in the Window Coaster Collage – Stencil Test Drive

Standard

My dear friend, Jessica Sporn, did a post on her blog this week about angels.  I was inspired.  So, when she asked me to test drive her new stencil from Stencil Girl Products called Windows & Doors, I said to myself, “self, you need to do something with an angel”…. and so I did.

As most of you who follow me know,  I love to collect coasters from restaurants.  Sometimes, our server is nice enough to give me a stash of them.. .but I do ask beg them nicely.  I love working small sometimes.  It’s just such a nice little piece of art.  The coaster surface is really great; it absorbs wonderfully and has the right thickness.

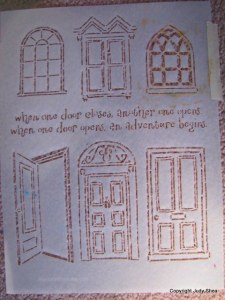
First, let me show you the stencil I”ll be working with… I’m going to use the top right church window. Seems appropriate for an angel, don’t you think?  Jessica really created a beautiful stencil here.

IMG_3335

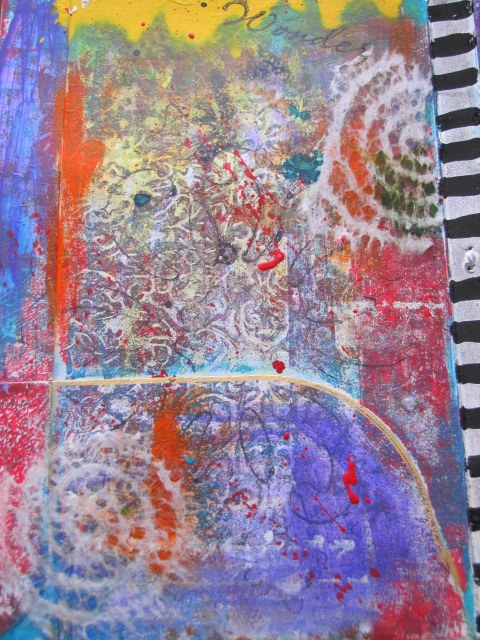
I picked out a 4″x4″ rounded corner coaster and started to apply gesso.   Let dry. Then I applied some random colors and smooshed with my fingers.

IMG_3301 IMG_3302

I pulled off some of the paint with another piece of paper.. this tip came from Jane Davies; simple and effective.  Then used a brayer to blend the colors.

IMG_3303           IMG_3304

When I started to dry the paint with my heat gun, I started to get bubbles which is a very cool effect.  If you hold the heat gun very close, the paint starts to bubble.  Once I got the colors the way I wanted, I brushed a loose wash of acrylic teal paint with water on top and spritzed some alcohol on it to let the paint separate.  Can you see the texture it created?

IMG_3309   IMG_3307

IMG_3305  IMG_3306

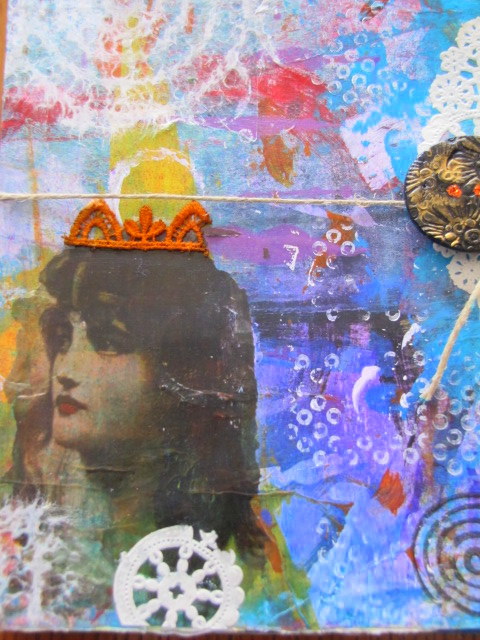
Now, I know I wanted to put an angel on my coaster, but I needed her face to show through, so I put a light coat of Titan Buff fluid acrylic paint (from Golden) in the section where her face would show.

IMG_3311 IMG_3312

Now, it’s time to transfer my image onto the coaster. I printed off the angel image on the rough side of a transparency film (ink jet printer). I took gel medium and with my finger, rubbed some along the section where I wanted my angel.  I also put some on the image itself.  Laid down the image and gently rubbed with a soft cloth.  Wait a couple of minutes, then gently lift it off. There you go… I like that it’s NOT perfect.. it has a worn/vintage look to it.  Now, let her dry.. doesn’t take too long; about 5 minutes.

IMG_3314  IMG_3315

Oh boy.. I get to play with pastes.  I used the Viva Decor Modeling Cream in gold for the window.
I placed it over the angel’s face, taped it down on one side.  Using my palette knife, I scraped the cream over the stencil and lifted it up… Beautiful window.

IMG_3317 IMG_3318

Now, one of the panes was covering my angel’s face.. I had to gently scrape it off.  There she is.. so purdy.

IMG_3320

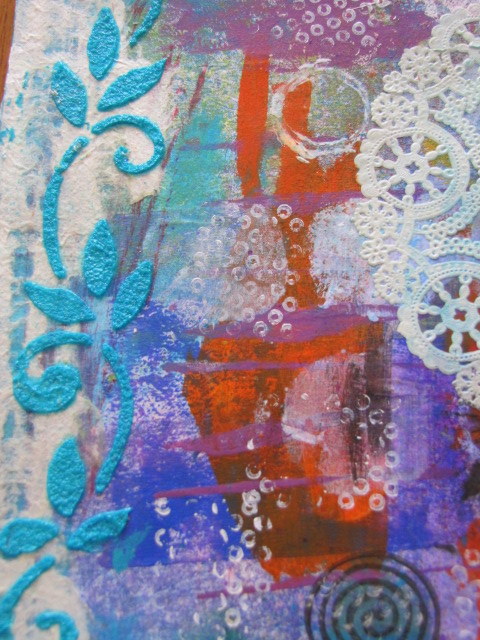
I added my spiral lace paper in the corner and used a pen tube as a stamp for some small circles.  Added gold ribbon lace to the bottom of the window.

IMG_3323  IMG_3326

I found an old earring that I cut up with a wire cutter to make a window top.  When I cut the metal, it creates tiny rough metal edges; so I filed them down with a Chizzel-it.  I’ve had this for years.  I used it for engraving baked polymer clay.  Oh, who am I kidding.. it was just a fun toy.  You can also use 200 grit sand paper to file down the sharp edges.

IMG_3327 IMG_3328

I added some glitter and painted around the edges with a Gold Leafing Pen. I love this pen.  It’s puts the best finishing touches on your work.

IMG_3329 IMG_3331  IMG_3332

I added a “believe” metal tag to the bottom.  After all, we DO believe in angels, don’t we?  Then I added some red lines of acrylic paint with my credit card that I changed to white in the end result… you’ll see why.

IMG_3333 IMG_3334

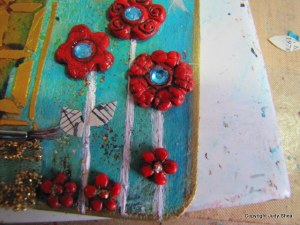
To the right of the coaster, I added handmade polymer clay flowers in red with turquoise (what else) rhinestone centers. Then teenie tiny flowers to the bottom of the stems.  The leaves are made with music paper. I thought the dragonfly was a cute touch, too.

IMG_3361  IMG_3363

Here is the final piece and a close up of window.

IMG_3369 IMG_3370

Now, it’s your turn to go visit my art sisters to see what they did with Jessica’s new stencil… go now!

Jessica Sporn, our leader in this drive.
Carolyn Dube  (by the way, Carolyn has a new Gelli Plate Workshop starting on April 1st… what fun; I can’t wait!)
Maria McGuire
Corrine Gilman (Corrine is going to be teaching at Lucky Star Art Camp this Fall… they are so “lucky” to have her join their team).

AND…Thank you, Jessica for another amazing stencil creation.  What else to you have up your sleeve?  Hmmm?

Well, there you have it.  So, grab some coasters next time you go out (or have a friend grab one for you) and get creative with them.  Then, send me a picture and I’ll feature on my blog.  OR.. create it, put photo on your blog, then comment on my blog with your link back to your blog… Huh?  What the hell did she just say?  Go on… you can do it… I know you can.

Alert… Alert… Up Next:  Giveaways !!

Thank you for stopping by.  Share the love.

Judy 

Mixed Media Mail Updo

Standard

Hey thereI know I know….I’ve been gone for about 3 weeks.  Life/work, once again, gets in my art way.  But no fear, I’m here now.

I’ve been working on this video for a few weeks. I finally found the time to finish it.  I started out as a large pamphlet I got in the mail.  I thought it would be neat to alter it with some mixed media magic. Once I finished filming, this sucker was about 45 min long.  So, had to cut it down a little and fast forward a lot.  I put some comments in so you would know what I was doing.   Let me know what you think.

If you have any questions about my process, give me a shout.. glad to help.

Now… enjoy!

Here are some close ups.

IMG_3288    IMG_3289    IMG_3290 IMG_3291   IMG_3292

IMG_3293   IMG_3294

If you  live in New England or even Massachusetts, you probably are ready for Spring like the rest of us. We’ve had enough snow this winter and I’m ready for a nice long walk… I don’t know… Maybe late April?

I hope you enjoyed the video.  Love to hear back from you.

Judy

Mixed Media Collage from a Post It Pad

Standard

I had so much fun creating my Post it flip chart paper collage.

It was hours of filming and editing, and would have been too long and I would bore all of you.. but here is a video of my process… sped up.  I would have kept it really time with my hand dancing, grooving to the music and talking, but it went on forever.  So…………

…. it started with my flip chart pad that I keep under my work surface.  An idea I got from Autumn Hathaway.. thank you Autumn.

Here we go…

Close ups. Click for larger view.

IMG_3165  IMG_3164  IMG_3166  IMG_3163

Let me know what you think. I would love to hear from you.

Judy

Stencil Test Drive – Starry Night – Stencil Girl Products

Standard

BWS tips button

Well, it’s my turn again to test out one of Jessica Sporn’s new stencils called Starry Night by Stencil Girl Products. This time around, I used the stencil creating two pieces.  I didn’t start out thinking I would do two, but it just seemed to fall into place that way.

PART 1 – First, I’ll show you my collage. I took Bristol Paper and made a paste of Super Heavy Gesso and Hansa Yellow Medium acrylic paint by Golden. Then I used the stencil to push the yellow paste through it onto the paper.  Let dry.

IMG_3068  IMG_3069

The result is below left.  Then I took Patina Green Glaze by Golden and spread it over the textured page. IMG_3071 IMG_3074 IMG_3073

Now, let’s start collaging.  I added some lace ribbon down the left side and then did a leaf stencil with the heavy gesso on the bottom right.

IMG_3077 IMG_3080

I had put some of the same stencil on other cardstock (as you’ll see in my next project), painted it blue and ripped it, and put gold leaf pen on ripped section then put down the right side.  Now, I’m adding more papers and fabric and end with one of my polymer clay “bellishments”; I chose Mr. Moon. Here’s how it developed IMG_3084 IMG_3086
I pounced some titan buff acrylic paint through some dry wall tape.  Love the dots. IMG_3087 IMG_3089
Added some rhinestones on the pink paper; fabric under Mr. Moon.  Store bought embellishment on top of the gold embossed paper.  Made the embellishment a flower with lace stem and magazine paper leaves.  Added another “bellishment” at the bottom right.  I like the orange contrast with the rest of the collage. IMG_3091 IMG_3094

Final collage.
IMG_3096

If you want to learn how to make my handmade polymer clay “Buttons n’bellishments”, come join us in my online class that starts in February on Joggles.com

PART 2 – Handmade Journal

I started out with other 1/2 of the Bristol Paper from my collage. I used my palette knife and spread extra heavy gesso all over it and let it dry.  I love the texture this gesso leaves.

IMG_3062 IMG_3063 IMG_3064
Then I took Ultramarine Blue acrylic paint by Golden and scraped it on the gessoed paper with a old credit card.  Just look at that texture.  It almost looks 3D.   Just beautiful for any texture queen.  Click on the pictures for a closer look.  Hard to believe it’s just a piece of paper.  My daughter thought it looked like denim. IMG_3065 IMG_3066 IMG_3067
Then I took the same yellow paste I made above with the heavy gesso and the yellow acrylic paint and used a palette knife to push the paste through the Starry Night stencil.  Helloooo.. is this cute or what? IMG_3069 IMG_3070
I took Liquid Laminate and brushed a layer over the entire page to give it a shine and strength.  You’ll notice that I only covered 1/2 of the page.  Once the laminate dried, I took some lace paper and put a few of my favorite spirals on the back then took a black sharpie pen and outlined the stars and swirls.  See the shine? IMG_3083 IMG_3097 IMG_3098
I took Wausau paper (cardstock like) that I got at an office supply store and made one signature of 5 pages.  I ripped around the edges for two reasons.. one to make them smaller than the cover pages and two, to give them a roughed up
look.
. IMG_3099 IMG_3100

Now, it’s time to sew the pages and cover together.  As I told you in my last post, I am not a journal maker. This is basic in one hole and out the other sewing.  I used black wax thread.  Then I sewed one of my polymer clay buttons to the cover.  Sprayed some Dylusions Ink to the front and back covers pounced some titan buff paint through the stencil and
called it done.   Badda Bing.. Badda Boom!

IMG_3101  IMG_3102 IMG_3105IMG_3104 IMG_3103  IMG_3106

Front and back cover

IMG_3107 IMG_3108

Well, that was fun.  I’ve never been sad doing art.

Check out Jessica’s post this week test driving her stencil.  Then go check out my partners in stencil crime, Maggie Nemetz and Revlie Schuit and see what they did with the Starry Night Stencil. Here are the Stencil Test Drive players:

January 23: Random Squares
February 27: Fun Borders
April 18: Flying Tulips
May 2: Cascading Leaves
Jane Davies, Maria McGuire and Carol MerveilleThank you, Jessica, for inviting me to be part of the drive.

Thanks for stopping by and I would love to hear from you.
Judy 

Coaster & Watercolor Collages & Stencil Girl Products

Standard

When I was at Art is You this month, I grabbed a few of the cardboard coasters from the bathroom.  Ok Art is You’ers.. didn’t you?  I was secretly hoping that Jessica would not take hers.  But, she did… and believe me.. I have plenty at home.

And speaking of Jessica, check out her blog.. she has amazing journal work and is co-running the Fall Fearless and Fly Challenge with Carolyn Dube, another amazing journal artist.

Back to the coasters…

Coasters are such a great little size to collage on.  There are many different sizes and shapes, they are small enough to work on while your watching tv or you just want to collage on a smaller scale.  And, for jounalers, just glue it into your journal after you’re done.  As a matter of fact, I have been known to ask the servers at restaurants for a few more, after I’ve confiscated the ones under my family’s glasses.  No. Really. I have a drawer full.  I have a problem.

So, I grabbed my 3 1/2″ square coaster and smeared some paint all over it with my old credit card.  One color then another, then some scribbling.. no plan.  I used one of my fabric transfers of a vintage angel.  Then, you look at it and say.. “wow, that’s cool.. how did I even make that effect”.  Right?   Been there?  So I wrote the colors I used what I did on the back, cuz I really liked the background effect.

Here is my result and my steps on the back of the coaster.  Just jot down what you did, cuz you never know what you’ll end up with.  The black scratches I used by dipping the edge of my credit card in back paint and making the marks.  I also used a diamond stencil with gold paint and pounced white paint through some drywall joint tape.

I feel like the angel is looking at the cross.  I am in love with the religious images.. the “vintagy” look and the colors.  I never really noticed them for their art before, but they seem to attract me lately.


You can check out one of my coaster collages and tutorials HERE.

Next up is a couple of collages on watercolor paper.  These both measure 8″x6″.

I started with Portfolio Oil Pastels.  If you don’t have these, they are just great for any collage/journal work.  I randomly scribbled lines…


Then rubbed the colors with a damp paper towel.  I added more shadowing on the edges.


Here are the final results…


The bird cage is a transparency transfer directly on the collage and the butterfly is also a transfer, but on thin cardstock that I ripped and stained with ink.  I worked on these side by side so they looked a bit related.  Sometimes, if I think anything is too bold and needs some toning down, I take some fine grit sand paper and give it a rub to fade the area.  It gives a worn look and pushes it back a little.

Finally….. I thought I’d share with you a quick collage piece we did at Mary Beth Shaw’s “Mores Is Less” class that I took at Art is You.  She asked us to play around on paper first before we started on our wood substrates.  I actually like how this came out.

… and speaking of Mary Beth Shaw… please stop by her STENCIL GIRL PRODUCTS site for some great shopping on all the stencils she has available. Stencil love is in your future.. I just know it.  Oh, and while you are there.. pick up some Wood Icing.  You’ll never leave home without it again.

Thanks for stopping by.  I love to hear from you.

Judy 

Art is YOU…Me… and We!

Standard

I’m back from Art is You.  What  a fun time.   As you know, this was my first art retreat.  First ever.. and I went alone.  Yup, just me and my talking GPS who kept me company.  C’mon, raise your hand if you think the GPS is awesome?  Wow, one, two, three… see there are a lot of you out there.  “Navigator” on my smartphone rocks!  Love her.

This is what we wore around our necks for the weekend.  So fun.  How could you not smile with that on you each day?  Each morning, we were greeted with a wonderful breakfast buffet and the same at lunch.  It really was a sense of community.  You can read about Art is You and about Sallianne and Ellen, it’s creators, HERE.  Thank you, ladies and anyone else involved in helping make the event a success.

Let me start by saying that as soon as I met my roommate, Jessica, I knew we were a good fit.   As soon as I walked in the room and saw that she had her journal pages and her art supplies all over the bed, I said, “ok.. now we’re talkin”.   Miss you JS.  Hey, we have the same initials.. that has to mean something, right? You can read Jessica’s blog post about AiY HERE.  I love it.

Ok Ok.. i’m getting to the fun stuff.

Saturday was a full day workshop with Serena Barton called Waxing Literacy with Charlotte.  We took an old hard cover book and used encaustic wax, creating a display piece.  Serena is such a great teacher and person.

Hi Serena.. our wax queen!

This class was so much fun.  I had never used encaustic wax before, never mind entrapping a book in it.  Serena gave us frozen chartlotte dolls that were going in a niche that we cut out of the book.  (click on any picture for larger image)

    
on right:  this is the inside of Serena’s book.. anything look familiar to you.. on the left in the center…hmmmm? She used one of my ‘bellishments.

  
This is the inside and out side of my book.

More books from the class…..

    
Far right:   I love that Nancy used a small child’s book.


Wasn’t that fun??  Thank you, Serena!

Getting ready for vendor night…  This place was packed.  Lots of walking around… my feet are still recovering. : (


Now, let’s move on the Sunday’s workshop with Mary Beth Shaw.  What can I say about Mary Beth?  We’ve exchanged emails back and forth about meeting. She’s fun, outgoing and a great teacher; making classes fun… oh and she plays some great music in class.  I’ve been wanting to meet MB and take one of her classes for about 2 years now and both were  more than what I expected.

Mary Beth’s class was called More is Less.  What a journey that was.  Making textures through stencils with paste.. my favorite thing to do.  I wish I had brought smaller substrates.  I worked too big and I think it was a bit overwhelming, to be honest.  So, I finished two.  Fair enough, let’s compromise.

Mary Beth gave me permission to take pictures of her demo.  Here’s a peek.

  
Yummy Wood Icing and pasta, yes pasta!


These are mine…

… and some of the rest….


..and here are Mary Beth’s 6″x6 boards… beautiful.

Thank you, Mary Beth!!

So, there you have it.. my two classes. Two full days and nights of just fun and camaraderie.  I made new friends and I was able to meet new artists in the mixed media world and say hello to the ones I have taken classes from before.

The ladies in my classes were so talented and fun to be with.  Just imagine being in a place where we all think about art the same, all want to learn and share.  What else could you want?  I plan on keeping in touch with many of my new friends (you know who you are).

..and… can I just say that I need a full body massage now?

Thanks for joining me in this art journey and stopping by.  I love hearing from you.

Judy ♥♥♥♥♥♥♥♥ 

Mixed Media Coffee Filter Collage Paper w/Video

Standard

I’ve had a few requests to show how I do some of my mixed media art.  Ask and you shall receive.

I filmed this about two weeks ago.  Then I had troubles with downloading/uploading, which software to use… yada yada yada.

Here is my first edited (poorly) video.  I decided to make a coffee filter collage piece to show you my process from start to finish.  No planning was done.. I just took out a stash of my “stuff” and see where it took me.

I don’t need to write much more here on the blog, as the video will give you all you need.  I used this same process using used dryer sheets or on a piece of fabric (I like muslin).

I hope you enjoy… and I apologize ahead of time for any hiccups in the editing (in addition to a whining dog, no not my husband.. ha ha).  I’m just getting the hang of this. I think little parts got cut out when I did the editing.  I can see that now.  But you get the idea here on adding layers and fun ephemera.

It’s 18 minutes long… so sit back and relax.  Silence all cell phones, as they say in the movie theaters.

Here are some closer still shots of the final piece.

So many uses… cut up your favorites parts and add to your journals and collages. Imagine this as a unique book cover with sewn pages.  Sew it on a canvas bag or add it to a quilt project.  It’s a pretty strong piece by the time you’re done with the layers of fabric, etc. and gel medium.

Click here to see another collage filter I made.

Here is a reminder of what you can do with the full circle filter:   See how I talk about putting this one together HERE.

Thanks for stopping by and for all your compliments, kind comments and some of you who asked for a video on how it put my art together.

Send this along to a friend who might enjoy it.

Please give this a try.. So easy.. I want to see yours.  Send me pictures and I’ll put them on my blog.

Love having fun with you.  More to come.

Judy 

Mixed Media Collage – “Serene Garden”

Standard

Hello my little peeps….. Remember the canvas I started a few weeks ago?  Here’s some photos to remember:

I really tried to paint, I did, but I was just not happy. I was trying to get back in the creative zone after my hiatus… BUT… I wasn’t and it showed.. to me, anyway.

Here is is now………..  Total new canvas, right?  This measures 11″ x 14″.

Here are some details….

Molding paste and stencils… cut doily and embellishments as flower….

Molding paste painted with gold.  Glass bead gel on fern….

Brooch as flower, polymer clay leaves. Bird cut off of a bird seed bag.  White dots are Tulip fashion paint.

I got some rhinestones going on along with some Stickles Glitter Glue.


Corrugated cardboard, lace flowers on bottom of cardboard, music notes fabric (stained with paint and water), polymer clay face, stamped bird.

Black and white stripes on sides of canvas.. I love the whimsey look.

So, there you have it, my new mixed media canvas named by my daughter as soon as she saw it as.. “Serene Garden”.

If you ever have any questions about any of the techniques, just let me know. I would love to share it with you.

Thanks for stopping by.  Back soon with some culinary art.

Judy

Mixed Media Tiny Collages

Standard

Well, here I am again..yes too long of a stretch.  But, here I am.

It’s definitely been an interesting few months with crazy work hours and my oldest daughter being in grad school this summer through next summer and my youngest daughter graduating from high school and heading to college in the fall.  We got through the parent/senior activities, the graduation, the party and a dance recital.  Moving my oldest into a college house, college orientations.   That doesn’t even include my job which is going through changes like I have never seen in my years here, a trip to Chicago for work.. and… and….  Wait.. am I whining?  Call the “waaaambulance”.  Take me, I’m ready.  Whew.. I feel much better now.

During all of my “un-Me” time, I got into this art rut, block, whatever you want to call it and I just couldn’t get myself up in the studio.  I started to think that something was wrong with me and why can’t I just get up and and start to be creative again. I asked, but no one answered.  Then, just recently I realized that I was successful at so many other things these past few months (see paragraph above) that art had to just go on the back burner for a minute.  I don’t know if it was guilt that was driving me to feel horrible about myself at not being successful at creating, did I care anymore about my art (yes, I do)  or just I was afraid to just start again. So, I am giving myself a break on those feelings now.  They are not completely gone, but definitely not as heavy as they were.

I also realized, after reading some inspiring stories, that after the silence of an art block, there can come great refreshing ideas.. a new window will open.. an opportunity of fresh art, work, creativity.  Ya, I’m still waiting for that.

The other thing I thought of was – I need a great workshop to attend.. something different and with a  real LIVE art teacher.   So, I have some plans for the fall, I decided.  I’ll be sharing that with you soon.

BUT… I did get up in the studio last night… Can I get a “woooo hoooo”.. did some painting, collage and some doodle art.  I was alone and it was blissful, I tell you… blissful.

Let’s get on with it, Judy… oh sorry.. yes….

So, I started making these little 2×2 collages a while back and I put some finishing touches on them.  I am just in love.. Working small is fun.

These are made using Stampboard, a great surface to make art on.  Here are the 3 and a couple of closeups.

I put them in a necklace box and painted the box black; sort of a shadow box effect.


I started with liquid acrylic paints. Then I added some little scraps of paper (black area). My handmade Dryer Sheet Collage Art Paper and my Gel Skin Art; just tiny pieces.  Of course my handmade “Button n’ bellishments” from polymer clay.  I added some tiny scraps of screening also. I just love the little embellishments and bling…. and the texture, the texture.. oh my favorite.

Working smaller can be a little less overwhelming if you don’t want to go big ………..or medium.

And look… look at what my oldest daughter gave me from her art classes in college.

Paper, palettes, paints, brushes.. All mine.  How can I not get creative with all of this yumminess in my possession?  Thanks, Megan.

Thanks for hanging in there with me.

Judy ♥  (I really wish that WordPress would have some better icons to put in the blogs) sorry.. no whining.