Tag Archives: texture

Mixed Media Mail Updo

Standard

Hey thereI know I know….I’ve been gone for about 3 weeks.  Life/work, once again, gets in my art way.  But no fear, I’m here now.

I’ve been working on this video for a few weeks. I finally found the time to finish it.  I started out as a large pamphlet I got in the mail.  I thought it would be neat to alter it with some mixed media magic. Once I finished filming, this sucker was about 45 min long.  So, had to cut it down a little and fast forward a lot.  I put some comments in so you would know what I was doing.   Let me know what you think.

If you have any questions about my process, give me a shout.. glad to help.

Now… enjoy!

Here are some close ups.

IMG_3288    IMG_3289    IMG_3290 IMG_3291   IMG_3292

IMG_3293   IMG_3294

If you  live in New England or even Massachusetts, you probably are ready for Spring like the rest of us. We’ve had enough snow this winter and I’m ready for a nice long walk… I don’t know… Maybe late April?

I hope you enjoyed the video.  Love to hear back from you.

Judy

Butterfly Collage with Ink Jet ImageTransfers

Standard

This week, I decided to give the Peerless Watercolors a try.  I purchased them at Art is You from Joanne Sharpe.

So, I stopped work early one night (5p.m.) (only one night, but i”m working on more of them) and I put on my jammies and sat myself down to play with the paints.  Let me just say what a great feeling it was to kick back and concentrate on my art.  Since my daughters are now both in college (help! send money), our nights have a bit more space in them.  Funny how fast the time goes and all of the sudden your here, their there and life moves on.  Screeeeeeech… halt… Sorry,  I got off track.  Continuing….

I decided to work on Strathmore Bristol paper and paint in patches all over the page like this…  Click on any image to enlarge.

Seriously, this page took me a couple of hours.  I had fun swiping colors off the “peerless” cards and onto the page. That took time and all with a small brush (water brush by Koi).  I love the puddling of the watercolors when you use more water.  They dry to a nice dark edge.

Once I was happy with the background,  I gave it a spray of PYM (Preserve Your Memories) to seal it.  You can see it deepens it a little.  I took this picture under a normal light bulb.  The top picture was taken under an Ott Lite.

So, my fine friends, I took it to my studio and scraped some gesso all over it (that’s why I had to seal the page first, otherwise the colors would have mixed), rubbed it off,  then buffed it dry.  Used black Staz On ink and a make up sponge with stencils (from Stencil Girl and Mary Beth Shaw = LOVE).  Added stamped, hand made foam stamps and of course some of my polymer clay ‘bellishments.  One of the parts I love the most, are my image transfers; the butterflies and the two women, under my teal heart..

Below, you can see some gold glitter trails it put in.

I get so lost in time when I am doing image transfers.  My favorite combination to make a perfect transfer is a transparency film and gel medium.  I did a few tests using different mediums and my best result was Golden Gel Medium.  I have not tried Liquitex, but I will someday.

I transferred on muslin  and cotton fabric, paper towel, masking tape and I did a packing tape transfer also.  I got the images from Dover Clipart which is copyright free.  You can join their mailing list and they will send you samples every week.  Click on THIS LINK and put in your email address.  You will get samples every week.  If you like them, you can save and download on your hard drive on your computer.

The technique goes like this:

Get yourself some transparency film. Maybe you know someone who might have some or you can split a box with a friend.  I had some old Lexmark ones and some I hadn’t used even after I printed on them  months or years ago.  You want to print on the matte side, not shiny.  Your best bet is to print a bunch of images on one page.  You can use Microsoft Word or Powerpoint to insert an entire page of images (please email me if you need help with that.).  This is my method. There may be other ways, for example, using a photo software would also work.

Cut your image out.

Spread some gel medium on the surface you want to transfer to and on the image itself… gently, you don’t want the ink to rub off.  Use the consistency of spreading butter on bread.  I use my finger to spread the gel, as I don’t want any brush line.

Lay the film with image face down on the gelled up surface and rub it down with your finger in a circular motion, working from the center and making sure your reached all around the image.  Now wait 5 or 10 minutes or even longer.. overnight even if you need to be away.  But, if you’re like me, you ain’t going nowhere and you want instant results.

After you’ve waited and I hope you were patient, peel up the film slowly.  Check a corner and see if the ink is now transferred to the surface.  If it did, then keep slowly peeling it off.  Did it work?  It works 99% of the time for me.

Here is a few pictures of my image transfer results…


The butterflies are on paper towel, cotton fabric (old ripped t-shirt) and masking tape.  I decided to color in the black and white clip art with the “peerless watercolors” and the “Koi” watercolors

I give the images a spray seal of the PYM so I  know they will keep their color and last a long time.

I made a bunch of image transfers on muslin fabric for my mom who loves her religious (catholic) books.  She wanted angels so she could sew them to her fabric covered books.  She was just in love with them.  I’ll be using my masking tape painted images on some other art; I wanted to use them on this page, but it didn’t seem to match.

Hope you enjoyed this post and I want you to try the image transfers and let me now how they come out.

And always… thank YOU for stopping by and leaving some blog love.

Judy ♥♥

Art is YOU…Me… and We!

Standard

I’m back from Art is You.  What  a fun time.   As you know, this was my first art retreat.  First ever.. and I went alone.  Yup, just me and my talking GPS who kept me company.  C’mon, raise your hand if you think the GPS is awesome?  Wow, one, two, three… see there are a lot of you out there.  “Navigator” on my smartphone rocks!  Love her.

This is what we wore around our necks for the weekend.  So fun.  How could you not smile with that on you each day?  Each morning, we were greeted with a wonderful breakfast buffet and the same at lunch.  It really was a sense of community.  You can read about Art is You and about Sallianne and Ellen, it’s creators, HERE.  Thank you, ladies and anyone else involved in helping make the event a success.

Let me start by saying that as soon as I met my roommate, Jessica, I knew we were a good fit.   As soon as I walked in the room and saw that she had her journal pages and her art supplies all over the bed, I said, “ok.. now we’re talkin”.   Miss you JS.  Hey, we have the same initials.. that has to mean something, right? You can read Jessica’s blog post about AiY HERE.  I love it.

Ok Ok.. i’m getting to the fun stuff.

Saturday was a full day workshop with Serena Barton called Waxing Literacy with Charlotte.  We took an old hard cover book and used encaustic wax, creating a display piece.  Serena is such a great teacher and person.

Hi Serena.. our wax queen!

This class was so much fun.  I had never used encaustic wax before, never mind entrapping a book in it.  Serena gave us frozen chartlotte dolls that were going in a niche that we cut out of the book.  (click on any picture for larger image)

    
on right:  this is the inside of Serena’s book.. anything look familiar to you.. on the left in the center…hmmmm? She used one of my ‘bellishments.

  
This is the inside and out side of my book.

More books from the class…..

    
Far right:   I love that Nancy used a small child’s book.


Wasn’t that fun??  Thank you, Serena!

Getting ready for vendor night…  This place was packed.  Lots of walking around… my feet are still recovering. : (


Now, let’s move on the Sunday’s workshop with Mary Beth Shaw.  What can I say about Mary Beth?  We’ve exchanged emails back and forth about meeting. She’s fun, outgoing and a great teacher; making classes fun… oh and she plays some great music in class.  I’ve been wanting to meet MB and take one of her classes for about 2 years now and both were  more than what I expected.

Mary Beth’s class was called More is Less.  What a journey that was.  Making textures through stencils with paste.. my favorite thing to do.  I wish I had brought smaller substrates.  I worked too big and I think it was a bit overwhelming, to be honest.  So, I finished two.  Fair enough, let’s compromise.

Mary Beth gave me permission to take pictures of her demo.  Here’s a peek.

  
Yummy Wood Icing and pasta, yes pasta!


These are mine…

… and some of the rest….


..and here are Mary Beth’s 6″x6 boards… beautiful.

Thank you, Mary Beth!!

So, there you have it.. my two classes. Two full days and nights of just fun and camaraderie.  I made new friends and I was able to meet new artists in the mixed media world and say hello to the ones I have taken classes from before.

The ladies in my classes were so talented and fun to be with.  Just imagine being in a place where we all think about art the same, all want to learn and share.  What else could you want?  I plan on keeping in touch with many of my new friends (you know who you are).

..and… can I just say that I need a full body massage now?

Thanks for joining me in this art journey and stopping by.  I love hearing from you.

Judy ♥♥♥♥♥♥♥♥ 

Fun Finds, Wood Blocks and ‘bellishments

Standard

Hard to believe that just a few weeks ago, we were melting from the heat around here.  Amazing how fast it changed.  Ok, ok.. so I already put my heat on a little… and I put on my electric mattress pad at night to warm up my tootsies. Ahhhh… one of the BEST inventions, I tell you.  “Honey, keep your cold toes to yourself”.

Well, I wanted to share with you some cool finds I came across at Michael’s.  They have a table full of marked down costume jewelry.  I bought a few to use in my work.  Here a bunch.  Aren’t they purdy?  I’m sure I will find a place for them in my collages.

Next, my new friend, Nancy, (love that I can say “new friend” in my 50’s) sent me, along with some other goodies, these pieces of jewelry.  I just need to lock myself a way in my studio for a week.  Just bring me bread and water.. ok ok.. some chocolate too. Who am I kidding.  I’ll come out to eat.

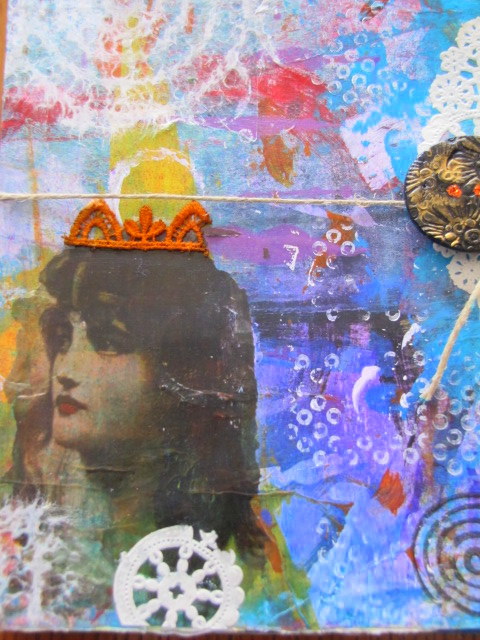
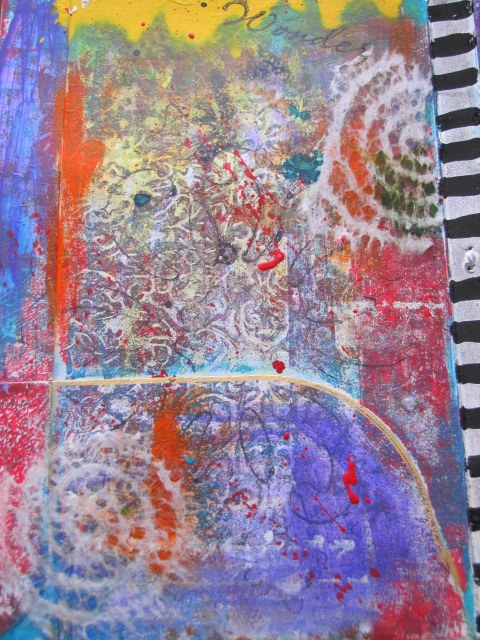
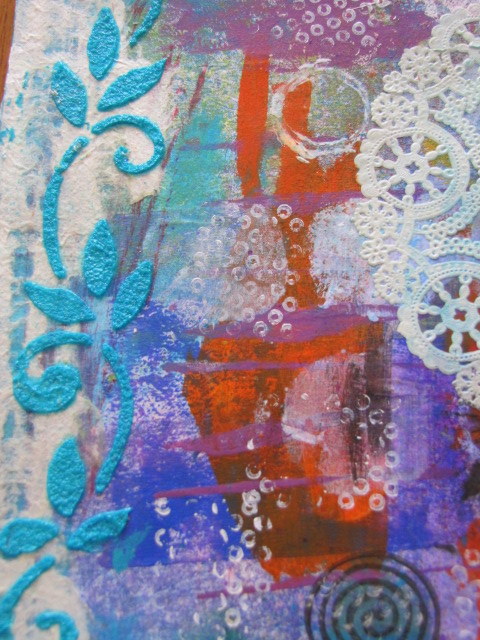
So, with all these new embellishments, I decided to make a few more of my own.  I love making these.  As you can tell, I just love the turquoise and the reds.  Oranges are great too. It all depends on what looks good with the staining.  Read on.

Hearts is what I went crazy with. Oh, and of course, I love the faces.   I made some tiny birds also, along with a pair of wings.  The ” ‘bellishements”, are made from polymer clay.  They are impressed with texture sheets, buttons, jewelry pieces.  Anything with texture really.  You have a cool pattern on the bottom of your shoe.. bam, texture.  You have a cool door knob .. bam, texture.  You have a cool embossed place mat, coaster, piece of hardware.. bam.. texture.  Look around you, it’s there.

However, recently an artist blogger friend did a post on some wood blocks that she got from a couple of co-workers.  Read Autumn’s post HERE then read more of her posts.  Her journal pages are to die for.  So, I thought I’d search out the import store (Ganesh Imports)  they got the blocks at and found a store in Newburyport, MA (where I go often).  Off I went and found some great wood blocks.  Thank you, Autumn for your post on this.  I would have never known about Ganesh.

Here is my find… the big one is about 2″ round.

Love them.  Have you ever seen a carver make a wood block?  Once you see it, you will appreciate it the work that goes into making just one block.  Take a look here.  Talk about patience.. poke a needle in my eye.

So, I decided to make few “medallion-like” ‘bellishments out of one of one of the blocks… the bigger one.

Take some polymer clay, get it soft, roll it up in a ball and press it out into a circle shape.  Then so the clay won’t stick to the wood, I put some cornstarch in an old t-shirt, tied it up, like you see below and pounced on the wood then lift and separate.. hmm, sounds like a Playtex commercial.


Now, bake in a dedicated clay oven per the directions on the package of clay.  (Note:  Go here if you are concerned about using your kitchen oven to bake clay).  Don’t burn it and tent it and you’ll be fine.   I like to use either “Premo” or “Fimo Soft”.  Once baked and cooled, I stained it with brown acrylic paint. Smoodge it in the deep textures, then wipe off gently with a clean paper towel, letting the paint stay in the grooves, let dry.  Then I take a sealer (I used Future Floor Wax) and brush one coat on, let dry.  That’s it.  Now you have your own ‘bellishment to use in your collages, journals, etc.

You can check out my step by step button’s tutorial I did HERE.


Now, let’s go back a couple of summers ago on my trip to Martha’s Vineyard in Edgartown.  I actually found some wood blocks there at a place called “In the Woods” (they do not have a website).  These puppies can get expensive, but they are worth it.  Here’s my purchase.  The bigger ones are about 6″ x 3″.

Can you stand it?  Aren’t they so much fun.  So different than any other rubber stamps out there… BUT I must say this…
They are made for fabric, not paper.  It can be done, but, you need to have some cushion under your paper when you stamp.  I just used a folded up piece of fabric or paper towel.  I just love using them to texture my clay.  LOVE. 

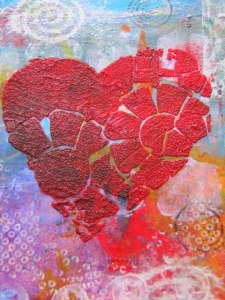
The other use for them is paper casting.  I use tissue paper for my casting; the kind you blow your nose with.  Here’s a look at some of the castings I’ve done…

This won’t work with detailed rubber stamps.  You can see the deep lines that really define the tissue. When the tissue is finally dry, you can paint and stain the pieces.  Use in your art anyway you want… Made by you.

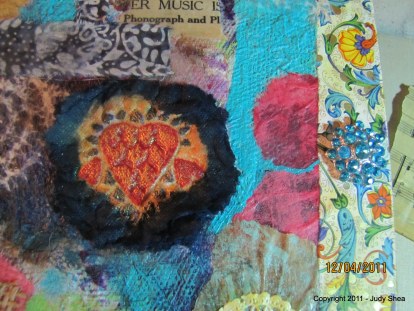
I used one casting on one of my book covers.. The dark blue circle with the read heart.

I’m getting ready to venture out to Art is You.. in Stamford, CT Columbus Day weekend.  It’s my first retreat that i’m going to.. alone.  It’s always fun to go to these things with a friend, but it didn’t work out this time.  However, I’m sure hoping to come home with many new friends.  I mean, not with me, of course.. HA! .  I’ve heard that is retreat is something special, one of the best.  So, here I come.  I’ll be taking pictures and blog about my experience.  I’m trying to make a bunch of ‘bellishments to take with me.  I’m thinking 100.. yikes. Better get moving a little faster.

Well, I’ve filled up your brain with a lot of info tonight.  I’ll be doing a tissue paper casting blog or video soon.

Thanks for stopping by and visiting.

Judy ♥ 

Mixed Media Collage – Re-post

Standard

I’ve been cleaning my studio this weekend… My gosh.. 2 large black garbage bags.  Why, tell me why do I need all this stuff?   Hmmm… anybody?   I haven’t touched most of it for 2 years.  Ok ok.. maybe 5.. I’m lying.. probably 7.  But that’s as far as I’m admitting to.   I got to the point when I walked in my studio, I felt surrounded by clutter and unfinished projects in bins.  That’s it… be brave and purge.  The stuff must go.. either trash it, donate it or sell it.  If I want to bring any new supplies in my studio then some must go. That’s my rule.  Stop spending the money for new supplies.. and use what you have.

I have about 100 magazines in total of Cloth, Paper, Scissors and Somerset Studio.  I’m purging them too.  They are worth a lot of money if you were to go buy back issues.  I’ll put them on Craig’s List and see if I can make a little cash on them.  If you’re interested, let me know.

So, never before seen footage, here is a quick shot of my studio. It’s an extra bedroom I took over.  I’m in the midst of the clean up.  I’m getting there.  God, that looks messy.   I need an organizer.. any volunteers?

In my cleaning, I came across one of my favorite pieces.

I thought I would RE-POST the blog where I showed the tutorial on how it developed.

———————————————————————————————————————

– Original Post –

I finally finished my latest canvas.   I started on a different path and ended somewhere else.  I like when that happens.  You begin a piece of art with different intentions and it takes a complete turn and you end up loving the result… in your happy place.

Here is how it started:

I took magazine clippings, map pieces, lace paper, scrap papers, doilies and glued them over the entire canvas.  Went in with a paint brush to cover up an white spots with cobalt teal fluid acrylic paint.  Then I gave it a wash with titan buff and water.  Let dry.  Then it sat around for a few weeks.

Here we go… first, let me say this is an 11×14 canvas.

I just started squaring off 4 sections with cobalt teal, raw sienna acrylics and dripped air brush paint on top.  Now, the cross lines and top right corner are made with “Wood Icing” by Mary Beth Shaw.   Mary Beth has a new mixed media book just out call “Flavor for Mixed Media”.  I just got it and it’s full of delicious art.. the culinary kind, too.  Right up my alley.  I felt a connection with Mary Beth, as we both seem to approach making food and art the same way.  I was lucky enough to be gifted a jar of this lovely ooey gooey paste (wood icing) by a friend (thanks, Raine!).

Continuing….

In the textured areas that I made with the wood icing, I painted with Golden quinacridone nickel azo gold acrylic paint and once dry, pushed in brown acrylic paint then wiped to reveal an antique look.  Went around edges with black portfolio oil pastel.  Pushed Golden Light Molding Paste through plastic doily tinted with cobalt teal.  I’m in love!

Bottom left: Fabric transfer on old dictionary page.. highlights, scrapings of paint with credit card.. lines, circles… what fun.

Here’s the final and details…

That was a great art journey for me.   I hope you enjoyed this re-post.  It’s always fun to go back.

Thank you for stopping by, as always.

Judy 

Mixed Media Collage – “Serene Garden”

Standard

Hello my little peeps….. Remember the canvas I started a few weeks ago?  Here’s some photos to remember:

I really tried to paint, I did, but I was just not happy. I was trying to get back in the creative zone after my hiatus… BUT… I wasn’t and it showed.. to me, anyway.

Here is is now………..  Total new canvas, right?  This measures 11″ x 14″.

Here are some details….

Molding paste and stencils… cut doily and embellishments as flower….

Molding paste painted with gold.  Glass bead gel on fern….

Brooch as flower, polymer clay leaves. Bird cut off of a bird seed bag.  White dots are Tulip fashion paint.

I got some rhinestones going on along with some Stickles Glitter Glue.


Corrugated cardboard, lace flowers on bottom of cardboard, music notes fabric (stained with paint and water), polymer clay face, stamped bird.

Black and white stripes on sides of canvas.. I love the whimsey look.

So, there you have it, my new mixed media canvas named by my daughter as soon as she saw it as.. “Serene Garden”.

If you ever have any questions about any of the techniques, just let me know. I would love to share it with you.

Thanks for stopping by.  Back soon with some culinary art.

Judy

Mixed Media Tiny Collages

Standard

Well, here I am again..yes too long of a stretch.  But, here I am.

It’s definitely been an interesting few months with crazy work hours and my oldest daughter being in grad school this summer through next summer and my youngest daughter graduating from high school and heading to college in the fall.  We got through the parent/senior activities, the graduation, the party and a dance recital.  Moving my oldest into a college house, college orientations.   That doesn’t even include my job which is going through changes like I have never seen in my years here, a trip to Chicago for work.. and… and….  Wait.. am I whining?  Call the “waaaambulance”.  Take me, I’m ready.  Whew.. I feel much better now.

During all of my “un-Me” time, I got into this art rut, block, whatever you want to call it and I just couldn’t get myself up in the studio.  I started to think that something was wrong with me and why can’t I just get up and and start to be creative again. I asked, but no one answered.  Then, just recently I realized that I was successful at so many other things these past few months (see paragraph above) that art had to just go on the back burner for a minute.  I don’t know if it was guilt that was driving me to feel horrible about myself at not being successful at creating, did I care anymore about my art (yes, I do)  or just I was afraid to just start again. So, I am giving myself a break on those feelings now.  They are not completely gone, but definitely not as heavy as they were.

I also realized, after reading some inspiring stories, that after the silence of an art block, there can come great refreshing ideas.. a new window will open.. an opportunity of fresh art, work, creativity.  Ya, I’m still waiting for that.

The other thing I thought of was – I need a great workshop to attend.. something different and with a  real LIVE art teacher.   So, I have some plans for the fall, I decided.  I’ll be sharing that with you soon.

BUT… I did get up in the studio last night… Can I get a “woooo hoooo”.. did some painting, collage and some doodle art.  I was alone and it was blissful, I tell you… blissful.

Let’s get on with it, Judy… oh sorry.. yes….

So, I started making these little 2×2 collages a while back and I put some finishing touches on them.  I am just in love.. Working small is fun.

These are made using Stampboard, a great surface to make art on.  Here are the 3 and a couple of closeups.

I put them in a necklace box and painted the box black; sort of a shadow box effect.


I started with liquid acrylic paints. Then I added some little scraps of paper (black area). My handmade Dryer Sheet Collage Art Paper and my Gel Skin Art; just tiny pieces.  Of course my handmade “Button n’ bellishments” from polymer clay.  I added some tiny scraps of screening also. I just love the little embellishments and bling…. and the texture, the texture.. oh my favorite.

Working smaller can be a little less overwhelming if you don’t want to go big ………..or medium.

And look… look at what my oldest daughter gave me from her art classes in college.

Paper, palettes, paints, brushes.. All mine.  How can I not get creative with all of this yumminess in my possession?  Thanks, Megan.

Thanks for hanging in there with me.

Judy ♥  (I really wish that WordPress would have some better icons to put in the blogs) sorry.. no whining.

Back and new stuff…

Standard

You’re probably wondering, where the beejeezus is Judy.  She never writes, calls or sends flowers.  Sorry, I’m here.. been a long stretch, but I have updates.

Anyway, I had two weeks off from work and it was nirvana, I tell you.  But the funny thing was, I thought I was going to be up in the studio most of the time, but it never really worked out that way.  Three of us got the flu and that set me back a week, daughter home from college, cooking, gathering.. and on and on.  So, here I am almost 2 months later from starting my canvas….  Nuff of that…  moving on now…

So, last time, I left you with the latest canvas I started.  Click HERE to remember.

I took more still shots  of my work, but not every single step in my progress.  I got so caught up in the fun creative process.  But, I have a surprise for you at the end of this blog.

Here we go…

So, here is the progress about 3/4 the way through.

I made some flower stems from fabric that I loaded up with gel medium and let them dry.  Then ripped a lace-like tablecloth in a strip and diluted it with paint for the “grass” for the flowers.  You’ll see in a minute.


I forgot to mention that I cut a necklace chain for the stem of the bottom flower.  Bracelets for the ground of smaller flowers that were actually bobby pins.

Then I made my polymer clay leaves for the flowers.  I must say, stamping into clay is so fun.  In the center flower at the top of the canvas, I also stamped text into the leaves.  I am loving that look.   I may take a small portion of a larger rubber stamp and if I don’t particularly like the stamp anymore, I’ll cut the section off that I like.   A small detailed scissors is great to cutting around a clay stamped image.

To see my tutorial on how I make my “Buttons ‘n bellishments, GO HERE.  This shows you the button process, but can be used the same for embellishments.

Here are some final pictures, but at the end, I’ll take you through the process with a surprise.

On my wall….

.. and finally, what I have been working on all day… a short video of me going through my canvas.  A few corrections on words I noticed I should have fixed, but I had already done the video once before, so I kept it in. It’s just me talkin it up with you.   I hope you enjoy and would love some comments.

MixedMediaCanvas by Judy Shea 12112 from Judy Shea on Vimeo.

As always, thank you for stopping by and sharing this blog adventure with me.

Judy

Bigger is not necessarily better

Standard

Huh?

I took on a challenge to start of large canvas measuring 24″ x 30″.  Not as easy as gluing, painting and collaging things on it like my other smaller works.  There are bigger spaces and I do the blank stare.  You know the look I”m talking about?  What the hell am I going to put in that big space?  Well, let me show you how it started and where I am with it now.

I gessoed the canvas then put on molding paste to get some texture on the surface.

I put a wash of quinacridone nickel azo gold paint then added Cobalt Teal in certain areas using Golden Fluid Acrylics.

So far so good, right?   Then I added some more texture with molding paste, stencils, doilies.

Then I added “Wood Icing” texture.

Here’s what the canvas looked like after the texture pastes.

Ok.. then I added two fleur di lis with molding paste, stained the wood icing and then I went on to painting the checkerboard and the fleur de lis…   Some parts I’m loving.. some.. eh.. not so much..

I am not liking the checkerboard… too overpowering.. so I”m going over it with a blue crackle paste.  I know, I know.. don’t worry.. it’ll be ok.

While the crackle paste was still wet, I ran a metal comb around in a cirle to give a spiral effect. Cool.

Here’s what the crackle paste looked like after it dried.  Love it.

Next up was to add some fabric to the canvas.  I used a caulking I bought at a dollar store a few years ago.  Works great.. strong bond.  I don’t stay with necessarily one product for adhesives.  I use gel medium, caulking and one of my favorites, “Weldbond“.

Let me stop here and tell you how much I changed on this canvas.  I got so engrossed into it that I didn’t take some pictures.  BUT… after I covered the checkerboard, I painted over the doily texture, then I put gold leaf on it.. then I put fabric over that.  Next, I painted over the wood icing, then I put fabric upholstery over the bottom half of that. I just was not liking where everything was falling.  I have a larger space towards the bottom that I’m not sure how that will flow.

So, here is the rest of the pix I took and then the last one is where is stands now.

Below, you can see I added more fabric and one of my coffee filter art pieces, and modeling cream by Viva Decor.

I pushed white acrylic paint into the crackle paste section then wiped it off.  The white sank into the cracks.  You can see the fabric to the bottom left and the roses on top.  Also in that area, I added an old paper doily piece that was ripped.

I also added cheese cloth to the large space on the bottom right and gold leaf.

See..this is what I mean.. bigger is not better, it’s a bit intimidating.  But, I am convinced that I will finish this and once I do, I’ll feel confident to tackle another one.

See what I mean about all the open space…. dun dun dun…. (insert scream here).

My plan is to get this done while I am on vacation from work.  I still have so much to do to it…collage papers, polymer clay…. I can’t wait to find out what I’ll do next.   I’ll blog my final pictures.

HAPPY HOLIDAYS, EVERYONE !!!

Thanks for subscribing and stopping by.

Judy

In the Studio – Tutorial & Give-a-way!

Standard

It’s still darn cold here in Massachusetts.  We are all wondering where Spring is.  We’ve taken 1 step forward and 5 steps back.  I wouldn’t doubt if we went from cold to hot and have no Spring at all.

Well, I’ve been sneaking in some art work in the studio and made a little tutorial for you.

You can see from my photo below what I used for materials/tools – palette paper, acrylic paints, Staz on ink pad in brown, Portfolio oil pastels (optional), Wood Icing,  drink coaster (I’ve been collecting them from restaurants for years), blending tool, Stampbord shapes.  Also not shown below… cheesecloth and gel medium.

Note: Click on all pictures for details.

I started out by taking a piece of cheese cloth layed out on palette paper and spread it with Golden Gel Medium… let dry.

It will rip right off the palette paper with no sticking.

Rip it to the size you want and paint with acrylics.  Here I used raw sienna and turquoise.  Set aside to dry.

Take a coaster and spread it with Wood Icing.  Let dry. and do the same with the small shapes of Stampbord.  I only iced 2 shapes for this piece.

While the Wood Icing is still wet, you can stamp shapes into them; I chose not to for this project.

Once dry, I scraped into the Wood Icing with a sharp tool to make designs.

I painted the coaster and smaller shapes with Quinacridone Nickel Azo Gold fluid acrylic.

Once dry, I spritzed them with Walnut Ink and rubbed into the surface.

Then I took the blending tool and brown Staz On ink and rubbed the edges of the shapes.

Oooooo… ahhhhhh… McDreamy.

Now, take the smaller shapes and spray more walnut ink to get into the scratch grooves you make and wipe off the raised areas.  Paint with acrylics or use Portfolio crayons to make beautiful colors.

Here is what I ended up with.  I scratched some circles and painted them and put some splashes of red in there to make them pop.  I also did a little rubber stamping on them.

I glued the cheese cloth on the coaster the added the finished Stampbord shapes.

Here is my end result.  Coaster measures about 6″x4″.

I love the colors of this piece.  Makes me happy.  So happy, that I am going to give it away.

Leave a comment here and pass it along to a friend to also leave a comment and I’ll pick a winner in one week (Wednesday, 4/27).  Make sure you leave your email address so I can let you know if you won.

Thanks for stopping by and playing along.

Judy