Tag Archives: inspiration

Faces Inspired by Artist, Michael Lang

Standard

I came across Michael about a year ago on YouTube.  I was fascinated. You will see what I mean if you take a look at this video.  If you don’t have time in your day, just watch the beginning, skip to the middle and then the end. You just won’t believe the end result.   He mixes a small amount of acrylic medium with his acrylic paints to make the colors just flow, blend and shade.  If you have time, watch some of his other videos.  Amazing!


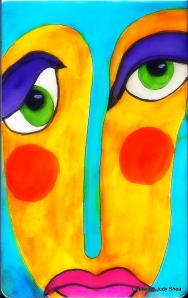
So, I sat myself down to play with some faces, Michael inspired.  I did not use his method of mixing the paint and gel medium.  I used watercolor paints in a Moleskine watercolor journal. Whatchya think?

Watercolor Face1      Watercolor Face2

It’s really freeing when you don’t have to make a mouth, eyes or lips perfect.  I loved using crazy, bright colors on the facial features.  Portrait rules are out the window.  Thank you, Michael.

Hope you enjoyed this fun little escape from the norm.

Thank you for stopping by; I’d love to hear from you.

Judy 

Getting Inspired with friends and Riley’s art

Standard

Well, it’s been a bit busy ova here lately.  Funny though I can’t even tell you why.  You know what I’m talkin about, right?   You get busy, the days fly by and you can’t even remember what you did the day before.  Oh wait… or is that just me?  Is that just me and my getting older?  Me being forgetful?  Me approaching menopause?  Me being……….. oh never mind.. I forgot.

Anyhoo… I want to share some lovely photos of a recent gathering I went to.  It was the Rhode Island Polymer Clay Guild’s 12th Anniversary.  I used to be part of the team there, but I stepped away about 4 years ago.  However, I do still keep in touch with the fabulous ladies there and they invited me back for the soiree.  We all brought some food.  The ladies all brought their art and I did not.  I just talked for about 6 hours.  What?

Here are some goodies that everyone one brought:

HULLO?  It was fantastic.  Thanks ladies for being such wonderful hosts… Toine, Bobbie, Sandy, Dora, Pat, Rita and Toni.

Some of the women there do more than just polymer clay.  The creativity and skills are vast, I tell you, in this small group.

I took some pictures that really inspired me.

Toine is a creative soul in that, if she could, would make her own shoes.  She’s told me this a few times.  That just amazes me.  She showed me a travel mini- watercolor paint palette that she made out of an mini eye shadow case.

You basically dig out the old eye shadow powders and fill the empty sections with watercolor tube paint and let dry.  She even uses the eye shadow brush as the paint brush.  You could just buy one of these eye shadow minis at a dollar store too.

Toine shared a site with me on how to make one.. it’s called INSTRUCTABLES.. great site to learn from.  I’m definitely trying this.   I just love this idea!

Toine also made her own mini watercolor pad.  It was about 3×4.  You can see it sitting next to her palette.  Another thing I must try.  Check out this one also at INSTRUCTABLES.

My partner in crime, Bobbie, was working on a new bracelet made out of buttons.  I recently sent Bobbie a bunch of my “buttons n’bellishments”.  She took my homemade polymer buttons and mixed them with regular buttons and hand sewed them to a thick black cloth elastic band.   I had made one in the past out of my polymer buttons, but hers came out much nicer.  I had too much space and you could see all the black band.

The red, turquoise, and bone-like buttons are the ones I made out of polymer clay.

Bobbie.. this came out deliciously gorgeous.  The trick to hers was the overlapping of the buttons so when you put it on your wrist, it didn’t stretch out and show the band.

Bobbie is also taking up water color painting.  Look at these beautiful pages she made that just made me salivate… ew.. not really… I behaved.

My creative juices went nuts when I saw these… oh the things I could do with those.  I can’t wait to see what she does with them.  It’s endless.

In other creativity news, I turn to children.  My great niece, Riley, is a great little artist.  I promised her I would take a picture of her door art at home.  Her creations here range over the past year from home art, pre-school and now kindergarten.  I share this now, with you, my blog friends.

Riley and her mom.

Mom, Christina, is another creative soul.  I guess it runs in the family.  You can see one of Christina’s creations HERE ..when she made me a special fabric card for my 50th birthday.

RILEY’s ART:

Isn’t Riley just awesome?  Look at these colors, people.  Don’t you think we should all display our art this way in our homes?   Don’t ever stop creating Riley.  I love you so much…. Love,  Auntie Judy.

I hope you are inspired.  Go make a mini water color palette or a button bracelet.  Be inspired by children’s art.

Thanks for stopping by and leave some comments for Riley.. she will love to read them.

Judy

A Wonderful Gift

Standard

Thought I’d put in another excerpt from Melody Beattie’s meditation book.  This one is about appreciating ourselves.

“It is time to stop the nonsense of running around picking on ourselves.  We have walked through much of our life apologizing for ourselves either directly or indirectly, feeling less valuable than others., believing that they know better than we do, and believing that somehow others are meant to be here and we are not.

We have a right to be here
We have a right to be ourselves
We are here.  There is a purpose, a reason an intention for our life.  We do not have to apologize for being here or being who we are.  Others do not have OUR magic.  We have our own magic.  It is in us.
It doesn’t matter what we’ve done in our past.  We all have a past, woven with mistakes, successes and learning experiences.  We have a right to our past.  It is OURS.  It has worked to shape and form us.  As we progress on this journey, we shall see how each of our experiences will be turned around and used for good.
We have already spent too much time in being ashamed, being apologetic and doubting the beauty of ourselves.  Be done with it.  Let it go. It is an unnecessary burden.  Others have rights, but so do we.  We are neither less than nor more than.  We are equal.  We are who we are. That is who we created and intended to be.
That, my friend, is a wonderful gift.”  – Melody Beattie

I sure wish I could write like that.  Although I have not and never have been in any sort of recovery/co-dependency, her writing touches my heart.  Picking this book up by mistake was, in fact, not a mistake in the long run.  It reminds me of how we are all the same in many ways.  We all want to be accepted and loved, don’t we?  We all just want our lives and the people in them to be good… I won’t say “perfect”… but “good” is good enough.

I’ll be back with some art very soon.  Work/life has been busy and consuming.. but stay tuned and come back.

Judy

Dryer Sheet Collage Art Cloth – Tutorial

Standard

Hey Bloggerdoodles…

I finally finished up my dryer sheet collage art cloth for you.

This process is so fun at at the same time, you are recycling your dryer sheets.  I hope you like it.

What you need: used dryer sheet, white glue, water, freezer paper, masking tape, brush for glue, paints and inks,  scrap papers, fabrics, ribbon, glitter…. just any kind of ephemera to make your layers and what makes you happy.

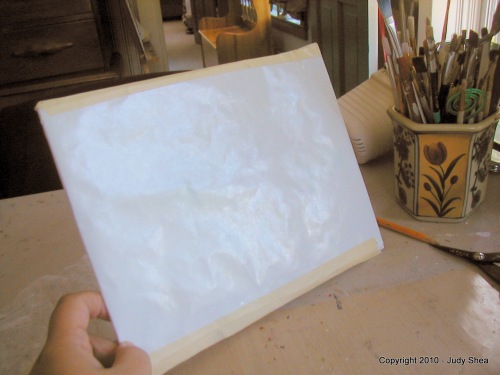
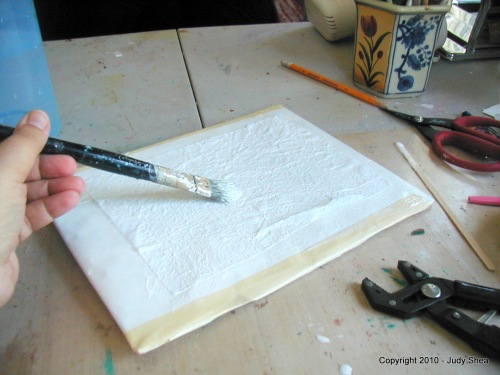
Tape a sheet of freezer paper, shiny side up to a piece of card board (taping it down to your work surface is fine, but if you use a piece of cardboard you can move it while it dries).

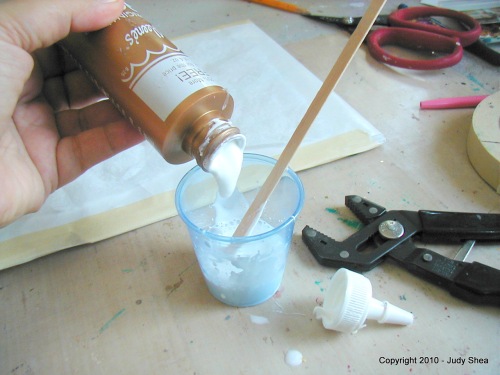
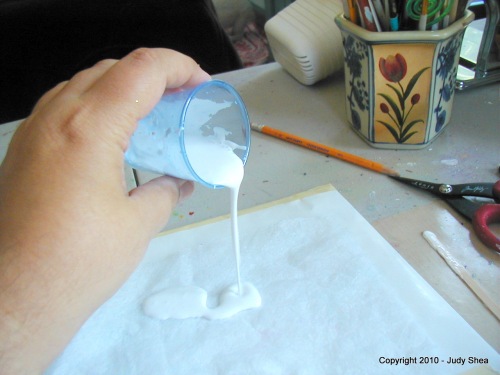
Mix glue and water in a separate container using a 1:1 ratio.  I play with it until it’s a syrup consistency.   Lay down the dryer sheet and pour the glue on the sheet and start to spread it until it’s all covered.

Here we go…. Let”s have some fun, shall we?

Now, you can start with anything you want, but here is what I did….

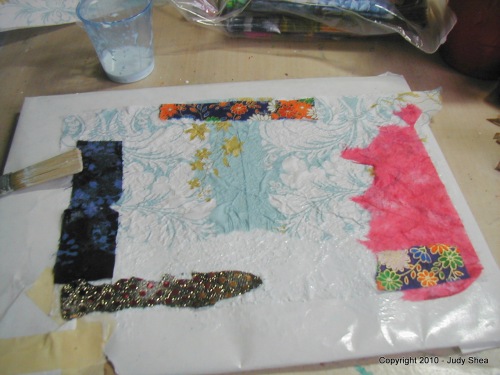
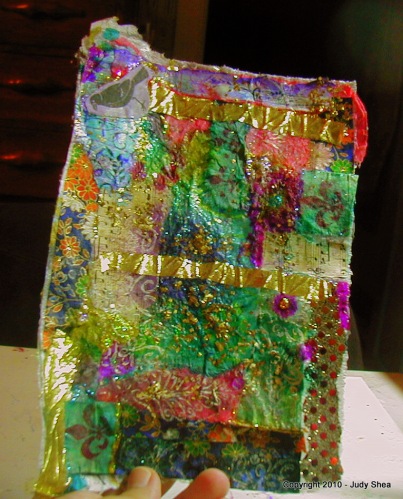
I started  laying and gluing down decorative napkins, tissues papers, fabric, ribbon and thin papers.  Don’t hesitate to use too much glue.. this will all dry clear and give the cloth strength.  Keep in mind, you are working on a very thin, transparent substrate; it’s needs the layers you’ll be adding to it.

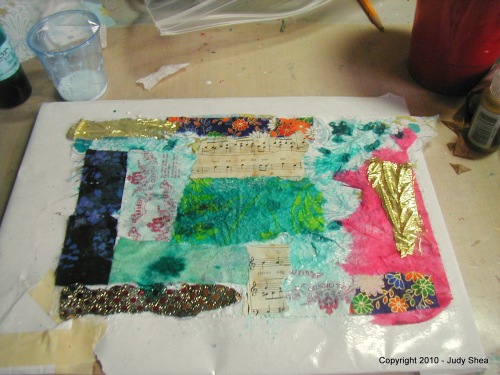
Then I dripped alcohol inks all over.  You can use glitter spray too or acrylic paints to make your own free form designs.

It’s getting there.  Just keep adding, layers until  you are satisfied.  Press down the glued pieces, making sure they come in good contact with the layer below it.

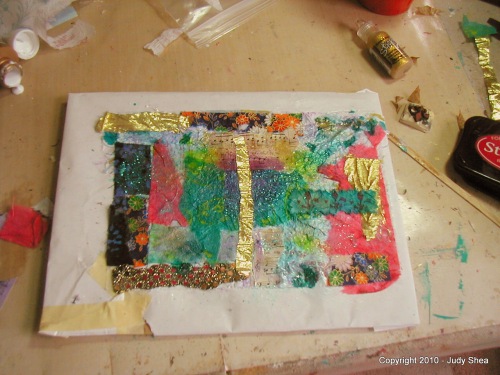
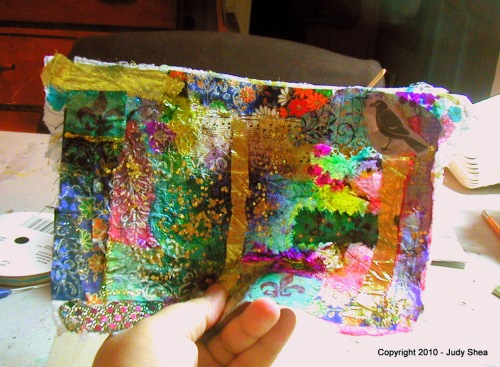
Here’s what it looks like when I’ve completed piece.  I added glitter and gold ribbon.   I am a gold-aholic.. I admit it.  Nothing seems done until I add some glitter and glam to it.  Tip:  Go to the hardware store and buy a small bucket of ceiling glitter; it comes in gold and silver.

Once your done, put this aside and let it dry several hours.. even 24.

Peel it off of your freezer paper and now, you’ve created a one of a kind, all your own design, collage art cloth.  For some last minute, I think it needed something else, addition, I used rubber stamps on it once it was dry.

Oooooooooooo….. ahhhhhhhhhhhhhhhhh.. lookie here…..

It is completely flexible.  You can cut it to you own shapes to add to your canvas art, journals, snip pieces to make greeting card designs.. it’s your world… go for it..

Click on each picture for a closer look.


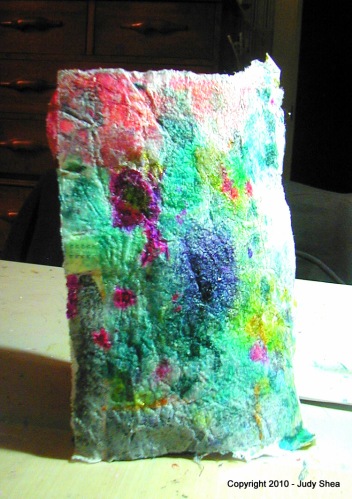
Take a look at the back of the cloth… pretty cool too.

Thanks for joining me and stopping by.  I do hope you enjoyed this tute.

Judy

Next up:   ATC workshop and renewing friendships.

Journal Book Review

Standard

Hey Blogsters!

I’ve never done a book review before, but I felt something about this one… It’s their first book and they would appreciate the press on it.  After all, isn’t that what the blogging community is about… sharing cool work with others,  giving each other high 5’s and saying “you gotta see this”?  Gotta pay it forward.

This new book is by two amazing journal junkies.   Meet Eric Scott and David Modler.  Yes, men.. Both artist-educators.   I guess there are not many men that journal; at least I haven’t come across any.  Well, they are …and are damn good at it (can I say “damn”?).  I’m not a professional book reviewer, here,  so it will be a short one.

“The Journal Junkies Workshop” is almost a journal in itself.   This book is partly dedicated to the memory of Dan Eldon.   Dan was an extraordinary person and kept journals all through his childhood, teens  and until he died, tragically.  His family continues his journey.  To be inspired and learn about Dan, visit his foundation website here and here.  His story is amazing, inspiring and really grabbed me.

There’s lots of energy going on in this book.  They got materials, prompts, how to keep a visual journal, techniques and great ways to jump start.. it’s jammed packed.  Go ahead a take a look at some of the pages here.  I found myself reading this book, putting it down.. picking it up… putting it down…. and I’m only putting it down because I had to do something else.  Like I said before, this book is like a journal with rich colors and their own pages throughout the book.  I like their writing style.   Here is quote from the book:

“Prepare to be bombarded with ideas, techniques and suggestions as you allow your creativity to take hold.  The Journal Fodder Junkies are on a mission, ready to arm you with all that you need to explore artistic ways of recording your life and thoughts.  Part sketchbook, part diary, part notebook, part dream journal, part daily planner, part to-do list and part doodle pad, the art journal is different things to different people.  Whatever it is for you, the Journal Junkies Workshop contains all the covert inspiration and know-how you’ll need to get started.  Uncover your own path, your own voice, your own style.”

Their website is here…. and learn all about Eric and Dave.
You can read more about the Journal Fodder Junkies on the blog that Eric created
here.

My work is done here.. good luck with the book guys.

Thanks for stopping by.

Judy

Next up… Mixed Media Backgrounds

Artist Trading Card (ATC) Swap and Tutorial

Standard

Hey Blogsters…

Did you think I forgot about you?  No way, I love you guys…

Just to give you a teeny weenie bit a background.. I am a member of “Lovin Mixed Media”.  LMM is a Ning network.  As a matter of fact, if I had to choose one place to just stay and eliminate all my other art memberships, this would be it.  It’s creator is Gary Reef; a fantastic artist who’s honest, fun and plain entertaining.  I want to hang out with him.   Well, the only way to describe Gary is to watch his YouTube videos.  He has an (as he would say) “amaaaaazing” staff running all different aspects of the site.  Gary has put a great team together to run “Lovin Mixed Media”.  You’ll notice right away, the hard work he and his staff do to create a phenomenal place to “hang out”.  It’s a well oiled machine.  Come join us!

On LMM I recently joined a new ATC group.  I’m not a huge fan of swaps because of some recent swappers or swap leaders not committing to the end, etc.. but, I think this one is honest and legit.  The leader is so excited to take this on.. and it continues.. there are no deadlines.

So, with that.. I decided to make my ATCs out of my first love, polymer clay and make it a tutorial so that whoever gets my ATCs can go see how I made them.

Here we go…..

As I said in my buttons tutorial, please keep safety in mind.. please visit that post for my “safety note”.

Here is what you’ll need to make these beauties:

  • One package of Polymer Clay (I like Premo or FimoSoft) – you may get 2 ATC’s from one package.  Light colors clays work best.. I like beige to get my results.  It “antiques” well.
  • pasta machine, acrylic roller or rolling pin.
  • rubber stamps, textures to imprint clay
  • baby powder, water or cornstrach to keep the stamp from sticking to clay
  • 2.5″ x 3.5″ template of ATC.  I made one out of clay, but you can also use a playing card. Glue a bunch together to make a thick template.  Make an ATC window out of heavy cardstock.
  • craft knife or clay blade
  • piece of saran wrap or piece of paper
  • dedicated polymer clay oven, if you don’t have one, read below.
  • acrylic paints
  • colored pencils (not water soluble)
  • paint brushes
  • stamp pad (I like StazOn)
  • alcohol and cotton swabs
  • sand paper (not too rough; 400’ish grit)
  • glitter glue
  • brown paint for “antique” finish
  • sealer (I like Future Floor Polish)
  • blow dryer or heat gun to speed up drying time
  • gold paint or Krylon 18kt Gold Paint Pen

Condition the clay until soft and pliable.
Roll the clay to a 1/16″ inch thickness.  On an Atlas pasta machine, I use #3.
If you don’t have a pasta machine, you can use your rollers and measure as needed.  Here are some ideas from Glass Attic under “no pasta machine?”.

Lay your sheet out on your flat and clean work surface.

Spray with water or use baby powder.  Now push your rubber stamp into the clay making sure you get a good impression.

Lift it up and make sure you see good lines to color/paint in between.

Now take the template/playing card and center over the impressed image.  Cut around it with a craft knife or clay blade.

Here is the image of another one I started; my favorite.  The entire face won’t get on the ATC, but it will still look good… you’ll see.

Now, here is another option if you do not want to impress the clay.   You can stamp right on the clay with the rubber stamp and ink pad, just like paper.  Don’t press hard enough to make indentations, but just enough to get the inked design on the clay.  I’ll do one for you.  Note: You can also stamp it after it’s baked which will allow you to press as hard as you want.

Once the clay is cut to the ATC size, you want to smooth down the cut edges.  I do this with a piece of saran/plastic wrap or you could use a piece of paper.  Just slide your finger around the edge gently, just enough to smooth down the sharp edges.

Now it’s time to bake the clay ATCs according to the clay’s package directions.   I put mine on ceramic tiles to bake.   If you don’t have a dedicated oven, you can use your kitchen oven, but make sure you cover the clay.  You can use parchment paper on a cookie sheet, but cover the cookie sheet with another one or cover with aluminum foil.   Also, make sure your oven is regulated at the correct temperature.  Let it preheat as necessary.  You may want to get a separate thermometer to make sure it’s correct.  You don’t want the oven to spike while the clay is in the oven.   If the temp is not steady, you will risk burning the clay and the fumes are not good.  Remember, these ATC’s are thin; pay attention to your timing.

Now they are out of the oven.  Get I get an “oh ya”??  C’mon people.

Take your sandpaper and sand around the edges.. take off anything sharp;  get it smooth.  Lay the ATC flat and with a firm but gentle hand sand the image.  Specifically, the places you will be coloring.  You want to gently rough it up.  This will allow the color to grab the clay.  Especially with colored pencils.  Try one section with no sanding and the other with.. you’ll see the difference.

Now it’s decorating time.  You can choose to use acrylic paints or colored pencils.  Pencils, I used Prismacolor.  Paints, I have used Golden, Claudine Hellmuth’s Studio Paints and basic craft paints.  Try what works best for you.  Your world, remember?

Start painting in the design.

You can speed up the drying time by using the blow dryer or a heat gun.. but don’t stay hovering over the ATC with the heat too long as it will soften the clay again.  So do it quickly like a fanning motion…. or just be patient and wait.. go have a cookie or even better, chocolate… oh, chocolate.. be right back.

I worked on several of ATCs at a as time seen here.  These are ready for an antique application.

This next step is what will make you go “ooooo…. ahhhhh….ohhhhh”.

After I took the supplies picture, I realized I left out my Golden Heavy Body Acrylic in Burnt Umber which, I feel works best and gives the lines a nice deep color.

With a soft paint brush gently brush the paint over the entire front of the ATC and push the paint into the lines of the stamped image.   Use caution when brushing.  Don’t use a heavy hand.  If you push too hard, you will rub a little of the paint off.

Take a damp paper towel or clean rag and gently, I mean gently, wipe the paint off the top.

“Oooooooooooooo”

“Ahhhhhhhhhhh”

“Ohhhhhhhhhhhh”

Let it dry.  Make sure the deep lines are also dry.

This is another favorite step of mine….. this will definitely make you feel the love.

Time to take out your sealer.  I like Future.  I guess  you could say “Back to the Future”..  get it?  No.. ok movin on.

Again, soft brush.. I gently brush on the Future and let dry.  You could do another coat if you wish.

Here is the ATC done with colored pencils… very pretty.

This just keeps getting better…

After the sealer is dry and you like the finish.. here comes the magic.  The whole process is magic.. each step just gets better and better.

Get out your glitter glue.. I like Stickles.  Start to highlight your image that makes you smile.  Bring them to life.  They are so beautiful, you’ll want to marry them… ok too dramatic?

This one continues to be my favorite.  It actually won 1st place in an ATC contest at a local art fair.  Woohoo!

Here is the ink stamped ATC with glitter…

The finishing touch is edging the ATC with gold paint.  I usually use an 18kt Gold Leafing Pen by Krylon.   After completely dry, brush a light coat of sealer on the edges.

Here’s a photo of my bunch of ATCs finished.   Lots of them will be going to England to begin the journey of finding new owners.

Be creative every day and have fun.

Thanks for stopping by.

Judy

I hope you create your own and show me your results.  I would love to see them.  Let me know if you have any questions.

Oh Buttons…Oh My

Standard

Hey Blogsters…

As you can see, my banner above is full of buttons, beads and embellishments.   Those are all made of polymer clay. Well I’ve been busy in the workshop making some to show you.   I thought I would show you how to make my buttons.

Some call me a texture queen cuz I just love textures.  In clay and on my mixed media canvases, pushed into molding pastes, built up by using stencils.. I’m in love.

So, let’s have some fun, shall we?

Safety note:  Make sure you wash your hands thoroughly after working with the clay.  Also, work in a well ventilated area when using the oven when baking the clay.  Make sure your oven is regulated.  If it spikes, it may burn the clay which will give off fumes.  You may want to test the temperature by using  a separate thermometer to show exact temp before you put your clay in the oven.  Please visit this site for everything polymer clay such as baking, brands, conditioning, safety, etc.  Just search via the index to the left.

What you’ll need:


  • 1 package polymer clay (I like Premo or Fimo Soft). I used a beige color to get the results I want, but you really can use any color; it’s your world.  A whole package will make several buttons.
  • textures: rubber stamps, jewelry, other buttons, doily, etc..
  • baby powder or water
  • brown acrylic paint
  • dedicated oven for baking polymer clay
  • knitting needle or wooden skewer to make the button holes
  • Future Floor Wax  or any other sealer or varnish
  • don’t forget rags, paper towels, too
  • optional: rubber gloves

Start out by conditioning your clay in her hands until soft and pliable.  I also have a dedicated electronic pasta machine to help with conditioning.

Depending on how big you want your buttons, make a log out of your conditioned clay.  Cut these into equal pieces if you want them to be all the same, and then roll into balls and then press with your finger to make a disc.   You can also use something flat, like a jar lid to smoosh it down.

Now, here is where the fun comes in.   Take your discs and start to impress them (maybe do a dance or tell a joke; just kidding) with objects or rubber stamps.  I am using a rubber stamp sheet that is flexible.

Sandwich in it between the sheet and press down making the textured impression.

Well, lookie there.  Are you excited yet?

Do this to all your discs, using the other textures… Here’s an old plastic doily that I pushed the clay into with a plastic lid.

Excited?   Okay, I’m exhausted.. I’ll do one more… tough crowd.

Now make your button holes using your knitting needle, wooden skewer or whatever suites your fancy.

Once you finish these steps with ALL your discs, it’s time for the shakin and bakin.. well, we’re not gonna shake, but we are going to bake.

Here are your buttons, ready to go in the oven.  I use a ceramic tile.

Bake these according to your clay package directions and visit the site I mentioned above in my “safety note”.

The timer has gone off and the baked clay is cooled, right?  Let’s keep going…

Here they are baked and cooled.

Feel like getting messy?  You may want to wear rubber gloves… or not… up to you.

Now, it’s time to antique them.   Take your brown acrylic paint and smoosh (there’s that word again) it into the grooves and crevices of the textures.

With a lightly dampened rag, wipe off the excess on top, so all that’s left if the paint in the deep textures.  This will also give the clay a golden vintage look.

Let dry completely or you can speed it up with a hair drying or heat gun, moving over it in a fanning fashion. Note: make sure your push your hole maker thingamajiggy back in the baked holes, as the paint will get in the and they need to be free of it.

Here they are all “antiqued” and “vintagy” (is that word? it is now)  looking.  I threw in a few turquoise buttons, one of my favorites.  Now tell me you’re excited.

One last step…….

Get out your varnish and brush on one coat on the buttons, front and back.

Let the varnish/future dry, or you can use your heat gun again.

Here they are finished.  So purdy.. I see you smiling.. you ARE excited?

Here are a few other techniques.  I used a burgundy clay with a gold antique, a black clay with turquoise antique and then the red button was baked with no texture then I stamped on it with a rubber stamp with black ink stamp pad.

You can certainly sew these button on sweaters or make smaller ones for shirts.  They can be washed, but in cold water and put the garment inside out.

My main uses are to use them in my mixed media art.  However, it you can make charms, bracelets, necklaces, mosaics. … Make a colorful bunch and fill up a glass jar.. put them in a cool looking bowl..just imagine.

Here is a small canvas I did with wire sewing one clay embellishment and thread sewing a button.  They are great for chunky journals too.

I hope you liked this tutorial.  I have such fun making these pieces.  They look so beautiful all in a pile; as you can see from my banner.

Please let me know if you have any questions… or have any feedback.

Please share this with your friends; it’s such a fun project with beautiful results.

Thanks for stopping by.

Judy

Next up……. Polymer Clay Artist Trading Cards (ATC’s) Workshop.   Don’t miss it!

… for the birds

Standard

Hey Blogsters:

I recently went to a fun filled workshop at Ink About It called Beeswax Birds. These were created by Autumn Hathaway.  Autumn is such a great teacher; one of the best.  What a fun time we had with her sense of humor, kindness and patience.   You can read about her, our class and see the “flock” of the birds made at the workshop on Autumn’s blog.  Thank you Autumn.  We hope you come back to Ink About It very soon… please!

Here is my bird (2 different lightings):

My next little fun project was a surprise find from a garden center store that was closing.  They were selling all their display shelving.  This was hiding in th corner, calling my name.  I knew I needed something in my studio to put my gels, mediums and smaller paints on and keep on my art table.

Here it is how it started:

I gave it a light sanding, painted everything but the shelves and started to add decorative papers/cardstock to the shelves.

Here it is after I painted the front of the shelves and added a crackle technique and stained it.

After everything dried, add did some rubber stamping  and paint doodles to the sides.

I am so loving that this sits on my table and at my reach.

Thanks for stopping by

Judy

Next up:  LOVE LETTERS

Mixed Media Frame and Fun

Standard

Hey Blogsters:

Well, right about now, I am sick of the cold here in New England.  But, on a good note, the daylight is around a little longer now.   I shouldn’t rush it.  Time goes by too fast enough as it is.

I’ve finished my Mirror Frame that I did for a special family couple of their two children.  I hope they don’t read this post yet, as I haven’t given it to them.

The size is 10″ x 10″.   I put something in front of me while I took the picture so there would be no reflection in the mirror.

The frame is made from wood (purchased at craft store), covered with 2 layers of tissue paper applied with Golden Gel Medium.  Once dry, I painted it with Golden’s Fluid Acrylic Carbon Black.

The squares are made of chipboard, they are about 1 1/2″.   I used Claudine Hellmuth’s Sticky Back Canvas for printing my pictures on.  I gathered my pictures from my photo software and put them on MS Powerpoint, making sure they were the same size as the chipboard.  I always use MS Powerpoint for printing and arranging several pictures on one page and in one place.  Once I practiced printing on paper several times to get the right size of the squares, I felt confident to print on the SB Canvas.

Cut the pictures from the canvas.  Before you stick them to the chipboard, I used a black paint pen to paint edges of each chipboard square.  Burnish the picture to each chipboard.   If the canvas spilled over a little on the chipboard, I just used a craft blade and self-healing mat to trim to size.   Sandpaper around the edges to sand down the tiny “burrs” of the canvas.   With a make up sponge wedge, I pounced the sponge on a StazOn black ink pad and just went around the edges of the picture to give it a shadow’y (is that word?) look.    Important:  At this point I laid out all the squares on newspaper in a well ventilated area and sprayed on a matte sealer;  I used Preseve Your Memories (PYM) spray.  Great stuff!

Before you glue down the pictures to the frame, I took silver acrylic paint and went around the edges of the frame and the mirror with a sponge.  Now, the squares are ready to be glued down to the frame.  Arrange the squares to your liking and glue down with strong glue; I used Weld-Bond.

In the top left hand corner of the mirror, I made a tiny polymer clay heart and after it was baked and sealed, I wrote the word “love” on it.  Glue to mirror with strong glue; I used Liquid Nails.

I hope you enjoyed this small tutorial.  Give it a try.   Nothing beats a handmade gift –  made from the heART.

Here is another playful piece I did in my studio.

I was playing with some colors on my palette paper.  After I was done, I swirled and smooshed the colors around for a cool background.  If you think about it, palette paper is made for wet paints, so why not recycle the pages to put in your journals, etc.  It takes a lot of wet media abuse.

As you can see, I just doodled with white paint pen.  Then I took some scrap tissue paper and glued a 1/2 face size to the edge.  Painted that with Golden’s Titan Buff Fluid Acrylic paint; let dry.  Then just played and drew a face and painted it.  Nothing serious at all.

Let’s call her……..um…..Fiona………. I put that doodle in her hair.  I think she’s looking at it saying… “she really just didn’t put that in my hair, did she?  That is so ugly.”    She hates it, I can tell..

Thanks for stopping by.

Judy

Open Your Hearts

Standard

Hey Blogsters!

For the past few months, on my walks, I’ve found some interesting heart shapes I’ve captured with my camera………BUT…

… Let me begin here with a quote from Melody Beattie’s book “Journey of the Heart”. She does daily meditations that are so touching.  I thought this would be appropriate for my heart post.

“Let your heart open-gently, safely, surely and certainly.  Do not let others decide when or even if you will open your heart, when or if you will embrace love.  Those choices are too big, too important to let others make for you.  Only you can decide when and how.” ….

“Look around.  It’s not your location that makes you safe.
It’s where you are in your soul, your mind and your heart.
That place is good.  That place is safe.
Open your heart.
Embrace life.
Go joyfully on your way.”
– Melody Beattie

So………….. I share my hearts with YOU:

vine

puddle on ocean rocks in Maine – I know this is pushing it a little.. but can you see it?

stones off my driveway; at this glance it’s a heart of stone.

vine leaf coming through brick walk

heart rock

… and finally I reveal to you my wooden heart collage that I’ve been promising.

I just love this piece.  You could even say I put all my heart into it.

Size: approx. 18″ x 14″

This piece started out as an old wooden painting I found at a consignment store.   What I used:  spackle, caulking, molding paste, vintage papers, tissue papers, fabric lace, gold leaf, old jewelry, polymer clay (face and button flowers),  found objects, charms, gesso, acrylic paints, stencils, rubber stamps, metal hinge.. whew.. that’s about all I can think of.

I hope you enjoyed my heart post..  Would love to hear back from you.

Next up:  Two weeks vacation from work for the holidays.  I’ll be in the studio to share some fun projects with you.

I hope all you have a wonderful and safe holiday… 2010.. can it be?

Judy