Tag Archives: Golden

Edgar Allen Poe Journal

Standard

Hey, everyone… This weekend is the end of July!!!  Can you believe it? Wasn’t it just May?

This weekend, I published a video on how to create of journal from a notebook.  I covered the back and front of the notebook, creating a personal journal, with layers and layers of paint and just did an overall mixed media frenzy on it.  After all the love/hate process and the stages it went through, I love the way it turned out.

I created this as a gift for my amazing niece, Christina, for her birthday.  She loves Edgar Allen Poe and she loves to write. So, I created this journal for her to enjoy and write in.

I hope you enjoy it.

If you do enjoy my channel, whether it be my art or cooking, I’d love it if you subscribe and hit the thumbs up.  Please share with all your family and friends.

I’ll be back soon for another video on some sort of art.. .culinary or mixed media.

Love to hear from you with your comments.

Thanks for all your support and being here.

Judy♥♥♥


Bigger is not necessarily better

Standard

Huh?

I took on a challenge to start of large canvas measuring 24″ x 30″.  Not as easy as gluing, painting and collaging things on it like my other smaller works.  There are bigger spaces and I do the blank stare.  You know the look I”m talking about?  What the hell am I going to put in that big space?  Well, let me show you how it started and where I am with it now.

I gessoed the canvas then put on molding paste to get some texture on the surface.

I put a wash of quinacridone nickel azo gold paint then added Cobalt Teal in certain areas using Golden Fluid Acrylics.

So far so good, right?   Then I added some more texture with molding paste, stencils, doilies.

Then I added “Wood Icing” texture.

Here’s what the canvas looked like after the texture pastes.

Ok.. then I added two fleur di lis with molding paste, stained the wood icing and then I went on to painting the checkerboard and the fleur de lis…   Some parts I’m loving.. some.. eh.. not so much..

I am not liking the checkerboard… too overpowering.. so I”m going over it with a blue crackle paste.  I know, I know.. don’t worry.. it’ll be ok.

While the crackle paste was still wet, I ran a metal comb around in a cirle to give a spiral effect. Cool.

Here’s what the crackle paste looked like after it dried.  Love it.

Next up was to add some fabric to the canvas.  I used a caulking I bought at a dollar store a few years ago.  Works great.. strong bond.  I don’t stay with necessarily one product for adhesives.  I use gel medium, caulking and one of my favorites, “Weldbond“.

Let me stop here and tell you how much I changed on this canvas.  I got so engrossed into it that I didn’t take some pictures.  BUT… after I covered the checkerboard, I painted over the doily texture, then I put gold leaf on it.. then I put fabric over that.  Next, I painted over the wood icing, then I put fabric upholstery over the bottom half of that. I just was not liking where everything was falling.  I have a larger space towards the bottom that I’m not sure how that will flow.

So, here is the rest of the pix I took and then the last one is where is stands now.

Below, you can see I added more fabric and one of my coffee filter art pieces, and modeling cream by Viva Decor.

I pushed white acrylic paint into the crackle paste section then wiped it off.  The white sank into the cracks.  You can see the fabric to the bottom left and the roses on top.  Also in that area, I added an old paper doily piece that was ripped.

I also added cheese cloth to the large space on the bottom right and gold leaf.

See..this is what I mean.. bigger is not better, it’s a bit intimidating.  But, I am convinced that I will finish this and once I do, I’ll feel confident to tackle another one.

See what I mean about all the open space…. dun dun dun…. (insert scream here).

My plan is to get this done while I am on vacation from work.  I still have so much to do to it…collage papers, polymer clay…. I can’t wait to find out what I’ll do next.   I’ll blog my final pictures.

HAPPY HOLIDAYS, EVERYONE !!!

Thanks for subscribing and stopping by.

Judy

Re-post – Gel Skin Art

Standard

Here is a re-post of the “skins”, I made a while back.  Thought you would enjoy a 2nd go round on reading it and for the new subscribers and visitors.

The skin with the beads, is my favorite.  I’ve been tearing that up and using it in my work for about a year now. Here is an example of how I used it recently in my coffee filter art piece; see post here.

First up was Golden’s Self Leveling Clear Gel and the Clear Tar Gel.  I took a palette knife and spread a good amount on some freezer paper.. like frosting a cake.

I sprinkled some finer glitters and shiny things like colored micro beads, sequins or whatever I had.  The self leveling gel and the tar gel had the same results.  I think I will try mixing color into the gel to make it a solid color, then adding the pretty shiny things.  Adding snipped colorful fibers or fabrics would be an interesting effect, don’tchya think?  I’ve done it and it is.

Then I took fluid acrylics and dropped dots all over a sheet until it was crowded and ran a knitting needle around it making swirls and shapes.

I also took blobs of paints at the top of the freezer paper and spread them downward, but they came out too thin.  Not so great.  Using heavy body paints might work better.  But, still interesting and one of a kind.

Once they are dry, you can peel them off of the freezer paper.  Now what do you do with them?  How about adding them to a collage page, journal page or  cut into strips or chopped up to put into some dryer sheet collage art cloth… see my tutorial here on how to make it.

I haven’t been back up in the studio since before vacation.. sad.  I’ll get up there, get my creative juices flowing and be back with some fun stuff.

Thanks for stopping by?

Judy

Mixed Media Collage Tutorial

Standard

I so enjoyed the 3 day weekend that just passed.  I was hot here in Mass.  A little too soon for me, but that tends to happen here.. not much of a Spring and then wham.. summer.  Give me a cold rainy day and I’m happy.  Strange, I know, but very comforting to me.  Whatchya gonna do?  Make art… that’s what… and that’s exactly what I did.

Here’s a tutorial just for you on how I made a collage on Bristol paper.  I started out thinking I would work on 3 collages at the same time.  Two on Bristol paper and one on deli paper.  The idea was to work on one while layers on another were drying.  Well, I started out that way, but there was too much going on and I couldn’t keep track of all the steps of the techniques.  I ended up focusing on one page for now.

You’ll see that I tend to lean more towards the teals, as in my other work too.  See this post and you’ll see what I mean, jelly bean.

Supplies/Materials:
Golden Gel Medium
Bristol paper 11″x14″
Golden fluid acrylic paints
Claudine Hellmuth Studio paints
scrap ephemera
polymer clay handmade embellishment (gotta have the clay in there)
lace papers
ink jet image transfer
my own hand carved rubber stamps
Portfolio Oil Pastels

Let’s start by showing you some of the handmade stamps I made.  Ok.. let me also tell you how I (bleep swear) at carving.   So they are not perfect and my back and neck  and eyes were sore after hours of carving, but they are my own originals.  Now, if you want to see some beautiful hand carved stamps.. go visit Autumn Hathaway’s website.. she is the queen of carving stamps.  She even has her own stationery line.  Gorgeous!

Here are mine.. aren’t they cute?  The pink ones are the ones I did this weekend and my own designs.

CLICK ON ALL IMAGES FOR A CLOSER LOOK

So, I started with the paper and scraped down some turquoise paint with a credit card.

Then added some Quin Azo Gold…

I used a little of the studio paints for patches of red.  More layers of turquoise and then I gave the entire page a wash with Titan Buff.  Ahhhh.  Let dry.  Actually, let all layers dry one at a time.

… and now, my friends… I begin the fun process of collaging.

I start the design using one of my stamps (love saying that).

STOP!  Wait a minute.. what time is it?  Did I forget to make dinner?  Um, ya, I think I did.  Ah, heck…. everyone for themselves; leftover night.

Continuing………. More of my stamps, scrap papers, corrugated cardboard from a coffee cup sleeve; stamped with red.

Added an ink jet image transfer from a transparency.

More papers, and stamps and lace papers.  Lace papers just melt into the collage when you use gel medium.

Here I put a strip of masking tape to protect the page from paint so I could put in a black and white stripe… then pull of to reveal a perfect line.  Love this.. makes me happy.

Here’s what it looks like before I start using Portfolio crayons.

I rubbed the black crayon around the edges.  I also used orange, teal, yellow and white crayon around the page.

Here’s the final.. I added a handmade polymer clay embellishment on one of the leaves. Also added a piece of my handmade tar gel skin with beads and glitter (right next to the spiral lace paper).  I cut about a 1/2″ from all around the edge of the page and snipped the corners.

Here are a couple of closeups…
  

There you have it.  I’m going to shoot for different colors on my next collage.  Ones that I don’t usually use.

Hope you enjoyed my tute.

Don’t forget to rate and  “like” me if you enjoyed this.

Thanks for stopping by.

Judy

Background Checks

Standard

Hey Blogmeisters!

Welcome to Friday!   Been cold and rainy here and down right brrrrrr for June in New England.

I’ve been working on some backgrounds and thought I’d share.  These just sort of came about as I sat in my studio playing with some new creamy crayons that are water soluable.  Click here to check them out.

This one, I used a gold paint as the first layer, then I mixed in cobalt teal by Golden in some light molding paste and pushed it through an old plastic doily.  It may look blurry, but it’s actually when the molding paste pushed through the fine mesh like plastic.. giving it a dreamy effect.

Next are yummy layers of acrylic paints, crayons, stamps, music paper, acrylic skins.  On the face below, I added glitter to her face and tried to capture it by tilting it.

… and below are backgrounds using credit/gift cards.  How fun to put them in mixed media backgrounds whole or cut them into shapes.

That’s it for now, as I prepare for my upcoming class tomorrow.  I’ll post pictures of the workshop.  I have some surprise goodies for my students.. here’s a sneak peek…..

Thanks for stopping by.

Judy

Next up:  Workshop Success !

Golden on my mind…

Standard

Happy Thursday, Blogsters….

I’m taking a long weekend away from my day job and spending time with my oldest daughter who is on her way to her first year at college.  She’ll only be less that two hours away, but I can still get a little weepy, can’t I?  I admit it, I one of those that cry at stupid sentimental situations on tv or if someone is telling me a story….. happy and sad.  Some of you parents out there know what I’m talking about.

So, as we take her to Maine on Sunday, I’ll have Labor Day to recover… and that, my little bloggers, means an art day for myself….<jumping up and down and whistling inserted here>…  AND…………… speaking of art………

……….as you may or may not know, I love textures.  Yup, I do.

Last week, after revisiting an on-line demo from my favorite Golden artist, Patti Brady, I pulled out some of my mediums to play around with.  Just watch her work these mediums.  This definitely isn’t Kansas anymore, Toto.

First, is the Fiber Paste.  This medium is amazing.  I never really gave it a good try before now, but the results are very fun.

I took a sheet of freezer paper (shiny side up).  With my palette knife, I spread a generous amount on the paper, as if I was frosting a cake, trying to minimize the peaks.  Let it dry overnight.

P8280017

I peeled it gently off the freezer paper.  Now what do I do with it?  I stared at it for a bit and as Madonna sang in her “Vogue” song… “….don’t just stand there, let’s get to it………..there’s nothing to it”.    So, I did……

I took washes of Golden Fluid Acrylic Paints and made three separate sections of colors (blue, yellow, red).  This fiber paper, really soaks up the paint.  Let the paints dry.  I did some doodling, rubber stamping and some collage of resin music paper, handmade paper and the famous “spoil me” girl from Art Chix Studio.

This is very pliable as you can see from the top picture.  I think I may put this in a journal or on a book cover.
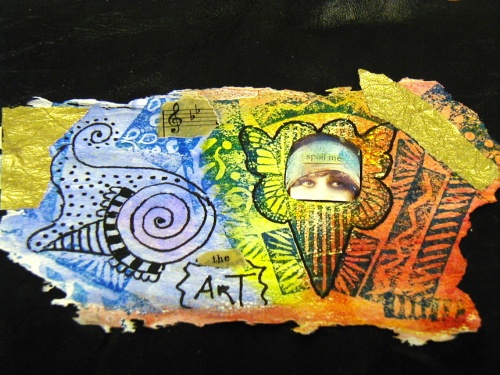
P8280024I just had another thought for this medium.   Put some in a small squeeze bottle and draw with it on freezer paper…. letters, flowers, doodles and once dry you have your own fiber thingamajiggys to put in your own art.

Ok.. now on to the Glass Bead Gel.

Shown below is what I used with the gel… fluid acrylic paint mixed into about a 1/4 of a cup of the gel.  I took a paper doilie, held it on top of this book cover and with my palette knife, spread the gel through the doilie.  Carefully, pull off the doilie to reveal the pattern.  Let his try overnight.  I say “overnight” because I’m usually doing my art in the evenings.

P8280018

You never think is will come out shiny, but it does.  After all, it is glass.  I hope I captured the pictures well enough to do it justice.

Below is a closer look… the glass beads are shiny and smooth to the touch.  I’m going to paint over it and wipe off the excess and see what kind of resist develops.

P8280019

I would love to here what you think about these pieces.. have you tried them?  would you like to? do you want to see other texture techniques?

Have a great Labor Day Holiday… and as always, thanks for stopping by.

Next up:  Perhaps another recipe???  Is it time?