Tag Archives: painting

Beet Juice, Fabric Transfers & Sketching

Standard

Remember my post about my roasted veggie salad?  Well, I roasted some beets again… just lovely…. but with the pieces I trimmed off, I boiled in water and made beet juice to dye some fabric pieces in.. check it out…..

Here are some pieces of cotton fabric and lace.. before the dying.

I boiled the beets in water and let it cool.. then stored in a squeeze bottle.  And let me tell you.. this juice has some serious staining going on.  When I was peeling them, my hands were so red.. then I read that in the original Red Velvet cakes, beet juice is where they get the red from.  Who knew?

Even after storing my juice in a container, I put cold water on top of the still remaining pieces and it’s still as red as ever… AND you know what else is pink if you eat a lot of beets?  Well.. never mind.

I put the fabric/lace into an aluminum pie pan and squirted and brush/dabbed on the beet juice.  Using rubber gloves, I squeezed the remaining liquid and let them dry.

These pieces are so pretty… Not sure what I’m going to do yet, but maybe some transfers and some sewing to put on a mixed media piece or on a journal page…

AND….. speaking of transfers, I was playing around with some fabric transfers.

I printed out two pictures of my funky faces I drew and a copyright free photo of a fairy.

These are small pieces of muslin..about 4″x3″.  I printed (ink jet, rough side) on a sheet of transparency film and used Golden Soft Gel Medium to transfer onto the muslin.  I think I’ve mentioned before that the transparency transfer method is my favorite and always works for me.  You can see the colors of these transfers.. almost exact from my printed picture.  They are so vibrant alone.

Click to enlarge pictures.

Once I let them dry, I did a small touch up with some acrylic paints.  On my faces, I painted the lips a bit more with red acrylic and used gold sticky spiral and added gold glitter to some areas.  With the fairy, used the gold spiral and gold glitter to make stars.  Maybe some sewing with gold thread all around the fabric edges?  What do you think?

THEN….Just for fun.. During the American Idol commercials (there so damn many of them), I’ve been sketching some faces without too much thinking.. just going for it…. Here’s a bunch crowded together.  Funny to look at each one.. do they remind you of anyone?

That’s my studio play for now.  Hope you enjoyed the peek.

I’ll be doing an update on my LARGE JOURNAL I’m making.. using the Bold Background pages I made from poster board. They are coming out yummy.  So.. stay tuned.

Thanks for stopping by.

Judy

Sketchbook Challenge – January

Standard

If you notice over in the right column of my blog, I have the Sketchbook Challenge badge.  I posted about it at the end of my last post.

I have to say (yes, I have to)…. I took the time to sketch.. Something I am not used to doing.. nor have I really ever done much.  I went to an fine art store recently and found some small visual journals.. one with watercolor paper and one with bristol board.  The notebooks only measure 5 x 3 1/2″.  Adorable.

The “Sketchbook Challenge” theme  for the month of January is “Highly Prized”

I’m really loving this..  Take my little notebook with my black liner pen and my little  water color paint set and hunker down with a cup of tea and play… fun and portable. I plan on doing more of this.  Talk about feeling like a kid again.. hits the spot.

So, to me.. my home and my family and what’s in my home (not materialistic things, but family and love) means so much to me… is “highly prized”.

Here is my funky doodle-like home… made with love

Remember this is only 5 x 3 1/2″.

I’m determined to learn how to draw trees better.

You can see the flickr group HERE for this challenge.  Run, don’t walk.

Thanks for stopping by.

Judy

Background Checks

Standard

Hey Blogmeisters!

Welcome to Friday!   Been cold and rainy here and down right brrrrrr for June in New England.

I’ve been working on some backgrounds and thought I’d share.  These just sort of came about as I sat in my studio playing with some new creamy crayons that are water soluable.  Click here to check them out.

This one, I used a gold paint as the first layer, then I mixed in cobalt teal by Golden in some light molding paste and pushed it through an old plastic doily.  It may look blurry, but it’s actually when the molding paste pushed through the fine mesh like plastic.. giving it a dreamy effect.

Next are yummy layers of acrylic paints, crayons, stamps, music paper, acrylic skins.  On the face below, I added glitter to her face and tried to capture it by tilting it.

… and below are backgrounds using credit/gift cards.  How fun to put them in mixed media backgrounds whole or cut them into shapes.

That’s it for now, as I prepare for my upcoming class tomorrow.  I’ll post pictures of the workshop.  I have some surprise goodies for my students.. here’s a sneak peek…..

Thanks for stopping by.

Judy

Next up:  Workshop Success !

Painted Pottery.. just for fun

Standard

Hey Blogsters:

To mix things up a bit and to just have fun,  I did something different from my usual creations.  I went to a paint your own pottery place with my two teenage daughters (19 and 15).

There is a place not to far from us called, ironically, Paint Your Own Pottery (PYOP).  Check out this great place.   This is an open, clean and friendly place for ALL ages.  The owner Vaishali Patel, is wonderful, along with her staff.

After it took me 30 minutes to pick out the bisque (because of her large selection) I wanted to paint, I then spent another 3 hours painting it.  What?  3 hours?  I know.

I decided to paint a large serving bowl, about 16″ round.  I thought it would have been easy to just slap on the paint, but there really is a method to it.  Don’t ask me why, but I decided to paint a little girly face in the center of the bowl.. and that took an hour itself because I had to work down in the base of the bowl with these tiny needle nose bottles of color.  The outside is painted with turquoise and then I dripped a dark purple around the edges so they would drip into the center.  I then added red dots along the bowls edge.

Here is a picture of my bowl.   I am very happy with it and my girls are loving their pieces also.

Sometimes it’s good to do something artistically different from the norm.  Especially if you have a bit of a creative block.  Shake things up a bit.

Thank you, Vaishali, for a fun and relaxing visit.

Thanks for stopping by.

Judy

Next up…. Buttons, Buttons, Buttons!

… for the birds

Standard

Hey Blogsters:

I recently went to a fun filled workshop at Ink About It called Beeswax Birds. These were created by Autumn Hathaway.  Autumn is such a great teacher; one of the best.  What a fun time we had with her sense of humor, kindness and patience.   You can read about her, our class and see the “flock” of the birds made at the workshop on Autumn’s blog.  Thank you Autumn.  We hope you come back to Ink About It very soon… please!

Here is my bird (2 different lightings):

My next little fun project was a surprise find from a garden center store that was closing.  They were selling all their display shelving.  This was hiding in th corner, calling my name.  I knew I needed something in my studio to put my gels, mediums and smaller paints on and keep on my art table.

Here it is how it started:

I gave it a light sanding, painted everything but the shelves and started to add decorative papers/cardstock to the shelves.

Here it is after I painted the front of the shelves and added a crackle technique and stained it.

After everything dried, add did some rubber stamping  and paint doodles to the sides.

I am so loving that this sits on my table and at my reach.

Thanks for stopping by

Judy

Next up:  LOVE LETTERS

Mini Canvas Graffiti Art

Standard

Hey Blogsters…

This will be a small post to match the small art, so I thought I’d share some fun mini canvases I created.

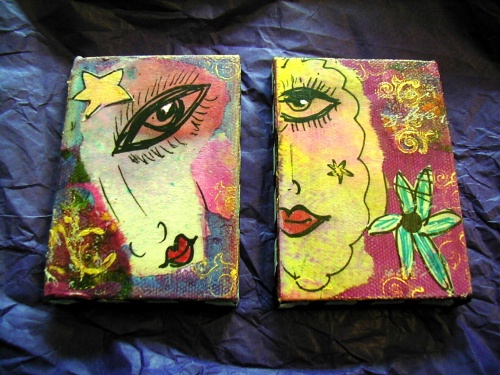
First, let me say that I am, by no means, a good drawer and I’ve accepted that.  However, I was doodling around on some newsprint paper that was used to protect a fragile something I purchased and came up with some of these fun graffiti/cartoon-like faces.  I only drew half a face on the edge of the paper and tore around it.  I used gel medium to glue them down over a painted and stamped background.  I loved the way the thin paper just melted onto the canvas using the gel.  Tissue paper is awesome using this technique.  I then painted a bit more over and around the images and here are the results.   Seriously, these faces were a result of just goofing around with my black pen.

P9170040The size of the canvases are 3 1/2″” x 2 1/2″.  Very fun to play with.  I got them from Dick Blick; see them here.

Just start with smearing some paint on a background, let it dry, add another layer, then stamp around it.. no rules… just fun play.

Give it a try.. go on.   I’ll wait here.

Thanks for stopping by.

Judy

The Little Canvas Project

Standard

I recently signed up for The Canvas Project.  You can read all about it here.  Basically, you are send 5  3″x3″ canvases with 5 random words that participants have submitted.  Each canvas has to be inspired by those words.  Talk about challenging your creativity.  They will be displayed in the Atlanta airport.  You have choice to sell them or not.  I do hope the take a picture of all of them and send it out.

My goal is to get them done before the end of May even though they are not due until early July, as my June’s schedule has left me literally no time for myself due to several family commitments.

As I stared at these blank canvases for a couple of weeks, I decided to just throw some backgrounds on them.  Here they are so far:

3x3canvasproject

Let me start by saying and as some of your know, I absolutely love texture.  Here’s what I did to them – They all received a coat of gesso.  Then I used a wash of paints on each one.  On the top 3 starting from the left.  I used a crackle paste, once dry, I sprayed walnut ink and rubbed off with dry cloth.  The next one I used a glass bead paste and let a wash of paint drip down.  Next, I used light molding paste pushed through and old plastic doily in the corner, once dry I rubbed on gold paint and then added purple ink from an ink pad all over it.  Bottom two:  Left – spread heavy molding paste around the edges, once dry, painted over with wash and used gold paint again to highlight the peaks.  Right – light molding paste pushed through stencil, painted paste once dry with purple paint and highlighted peaks with gold paint..also painted the background yellow, let dry, then painted with deep orange and sprayed water droplets and when almost dry, absorbed droplets with cloth to reveal background.  Each canvas was edged with gold paint.  As you can see on a few of them, they have white circles.  I took an ink pen cover and dipped in white paint and stamped the circle.

Now I must give my little pieces of art life with the inspired words.

I will post my final canvases in my next post.

Thanks for stopping by.

Judy