I’ve been cleaning my studio this weekend… My gosh.. 2 large black garbage bags. Why, tell me why do I need all this stuff? Hmmm… anybody? I haven’t touched most of it for 2 years. Ok ok.. maybe 5.. I’m lying.. probably 7. But that’s as far as I’m admitting to. I got to the point when I walked in my studio, I felt surrounded by clutter and unfinished projects in bins. That’s it… be brave and purge. The stuff must go.. either trash it, donate it or sell it. If I want to bring any new supplies in my studio then some must go. That’s my rule. Stop spending the money for new supplies.. and use what you have.
I have about 100 magazines in total of Cloth, Paper, Scissors and Somerset Studio. I’m purging them too. They are worth a lot of money if you were to go buy back issues. I’ll put them on Craig’s List and see if I can make a little cash on them. If you’re interested, let me know.
So, never before seen footage, here is a quick shot of my studio. It’s an extra bedroom I took over. I’m in the midst of the clean up. I’m getting there. God, that looks messy. I need an organizer.. any volunteers?

In my cleaning, I came across one of my favorite pieces.
I thought I would RE-POST the blog where I showed the tutorial on how it developed.
———————————————————————————————————————
– Original Post –
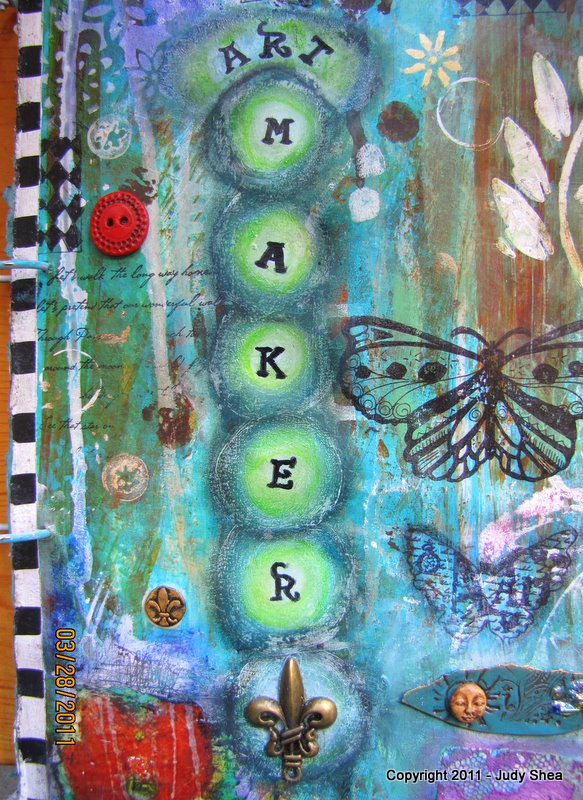
I finally finished my latest canvas. I started on a different path and ended somewhere else. I like when that happens. You begin a piece of art with different intentions and it takes a complete turn and you end up loving the result… in your happy place.
Here is how it started:
I took magazine clippings, map pieces, lace paper, scrap papers, doilies and glued them over the entire canvas. Went in with a paint brush to cover up an white spots with cobalt teal fluid acrylic paint. Then I gave it a wash with titan buff and water. Let dry. Then it sat around for a few weeks.

Here we go… first, let me say this is an 11×14 canvas.
I just started squaring off 4 sections with cobalt teal, raw sienna acrylics and dripped air brush paint on top. Now, the cross lines and top right corner are made with “Wood Icing” by Mary Beth Shaw. Mary Beth has a new mixed media book just out call “Flavor for Mixed Media”. I just got it and it’s full of delicious art.. the culinary kind, too. Right up my alley. I felt a connection with Mary Beth, as we both seem to approach making food and art the same way. I was lucky enough to be gifted a jar of this lovely ooey gooey paste (wood icing) by a friend (thanks, Raine!).

Continuing….
In the textured areas that I made with the wood icing, I painted with Golden quinacridone nickel azo gold acrylic paint and once dry, pushed in brown acrylic paint then wiped to reveal an antique look. Went around edges with black portfolio oil pastel. Pushed Golden Light Molding Paste through plastic doily tinted with cobalt teal. I’m in love!


Bottom left: Fabric transfer on old dictionary page.. highlights, scrapings of paint with credit card.. lines, circles… what fun.
Here’s the final and details…


That was a great art journey for me. I hope you enjoyed this re-post. It’s always fun to go back.
Thank you for stopping by, as always.
Judy ♥


