Category Archives: rubber stamps

Rubbermoom Rubber Stamps by Jessica Sporn

Standard

Hey folks.. howzitgoing??  It’s been a bit hot the past couple of days and we haven’t had any rain, but today we are getting a much needed soak.  What a perfect day to do some art, don’tchyathink?

Jessica Sporn asked me to see what I could do with her new rubber stamps from RubberMoon. Thanks, JS.  My first thought, was to create something in polymer clay, but then I remembered some fun paper casting I had done a couple of years ago to make some cool embellishments.

I used two of Jessica’s stamps.  KRISHNA and MEZUZAH; you can see and order them here.

Let’s start, shall we.

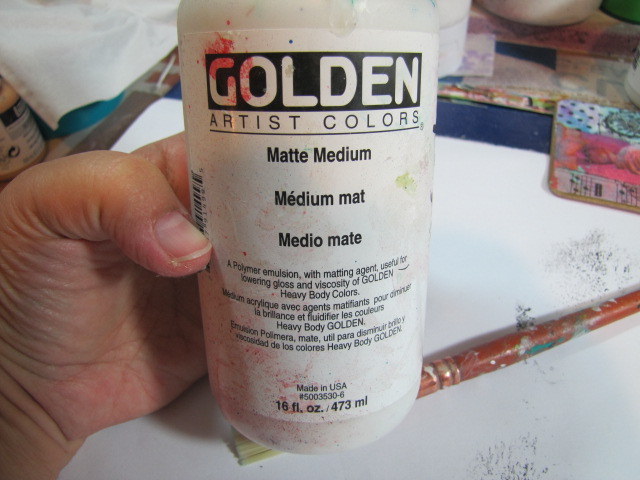
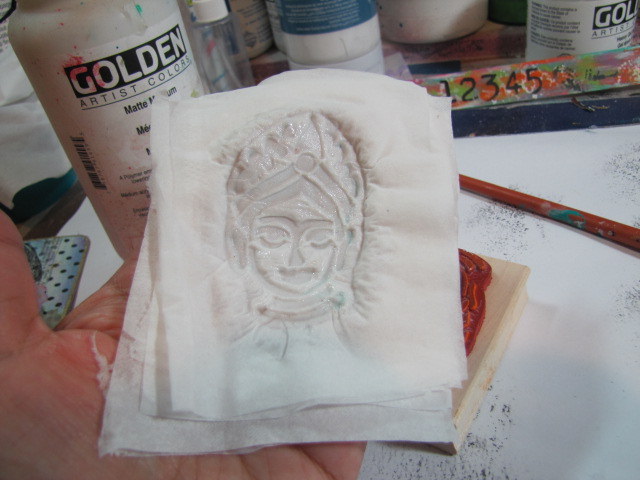
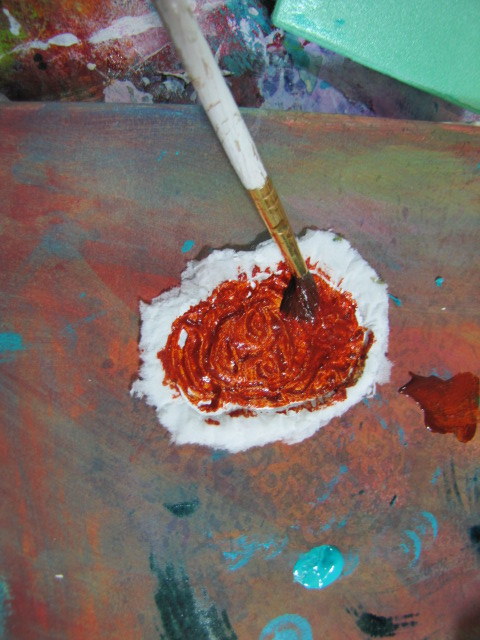
I took 2 Kleenex brand tissues and pulled apart the plys. That gave me 4 layers, but now cut them in 4’s. You want to have a small stack of square tissues. I used about 7 layers for this.  Using matte medium and the rubber stamp facing UP, start to layer one tissue on the stamp and brush the medium over it, covering the design.  Keep repeating until you use up the 7 layers.  You can try more layers if you want.  Here, I’m using KRISHNA for my tutorial.

IMG_4910 IMG_4911 IMG_4912 IMG_4913

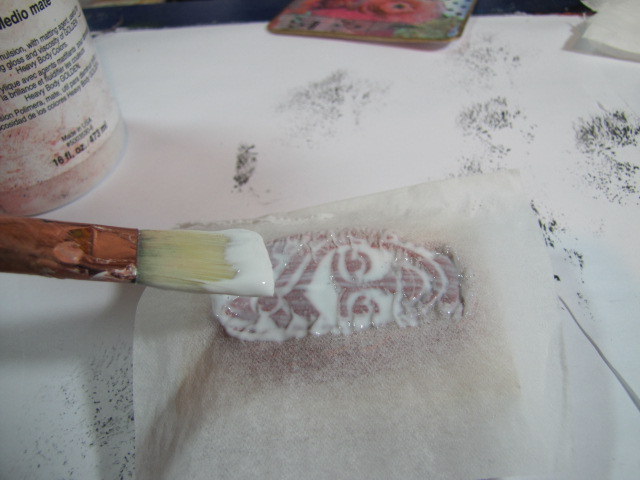
After each brush of the medium, I gently rub my finger of the layer to smooth it out and make sure the design shows it’s details.   Now, gently lift the layers off of the rubber stamp and you can see the design.

IMG_4914 IMG_4915

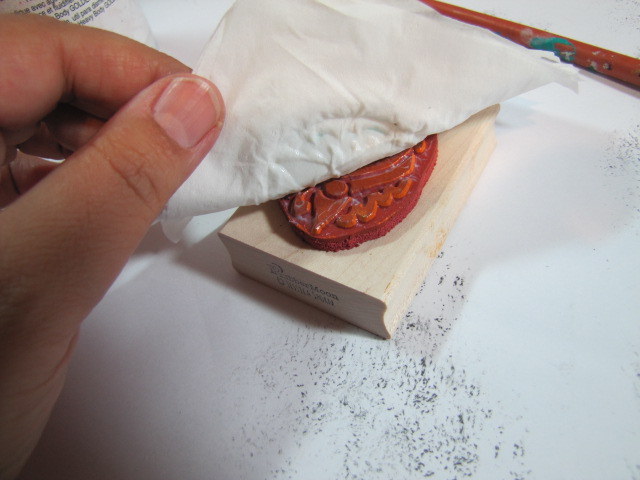
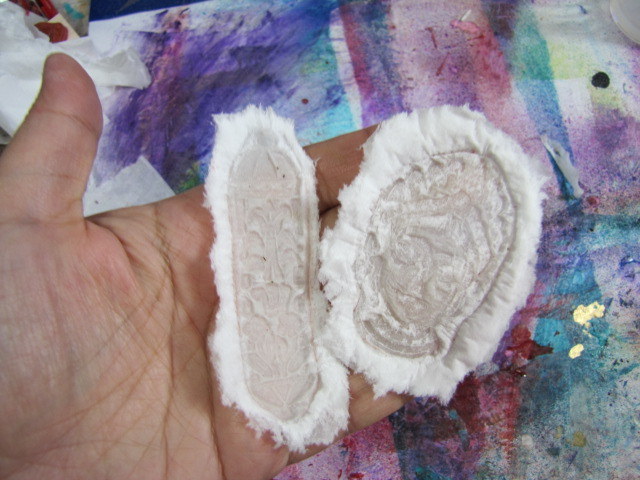
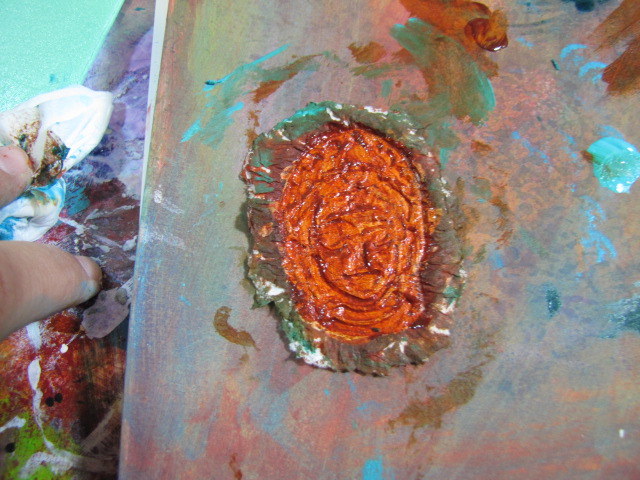
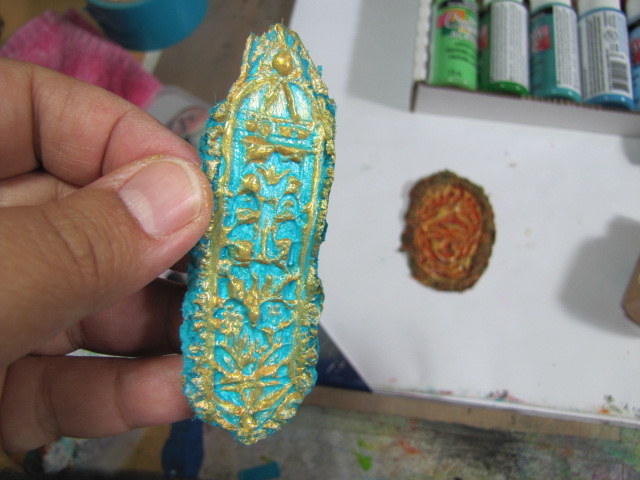
Let this dry for a few hours until hardened.. or even overnight.  You can see the two rubber stamps dried below.   Next I ripped around the edges of the square tissue to round them off.  Then I took white acrylic paint and painted the the top of the design.

IMG_4856 IMG_4858 IMG_4859

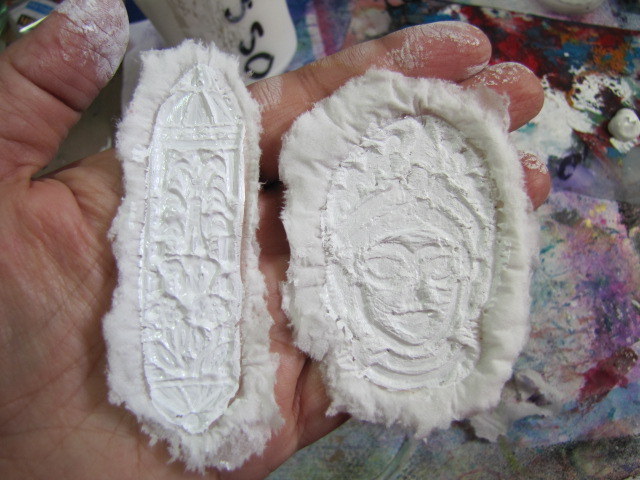
Time to add some color. You can use any colors you’d like.  I painted the entire image, let dry. Then I used gold acrylic paint and a pearl pen to just highlight the the parts that were elevated. I just mixed them on a palette then used my finger to gently swipe the color.

IMG_4877 IMG_4878 IMG_4879 IMG_4880

IMG_4891 IMG_4892

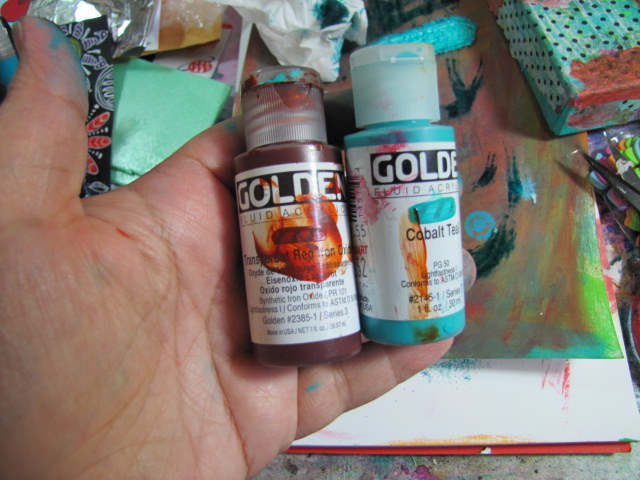
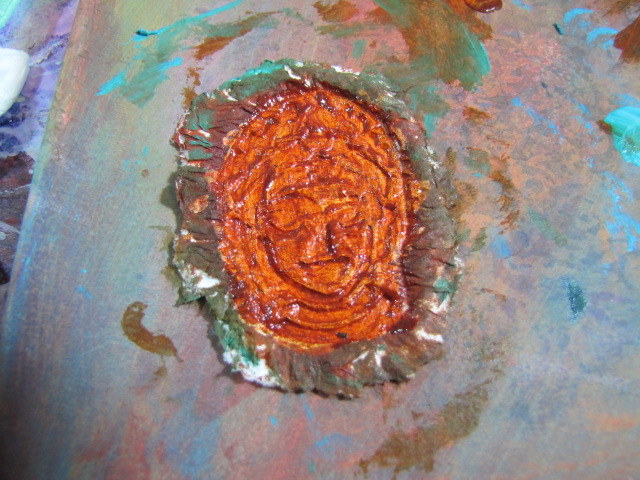
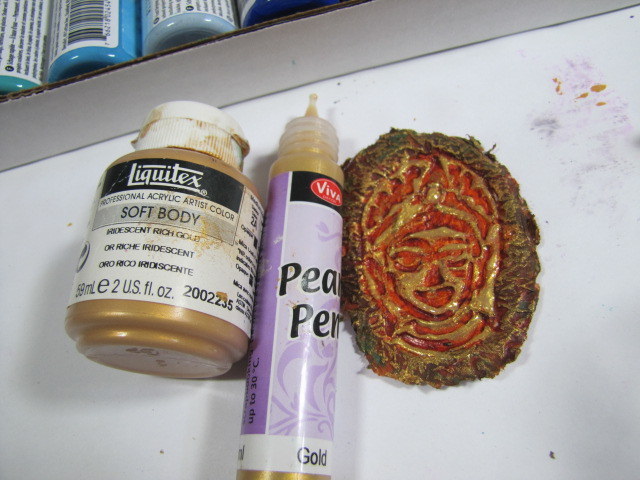
I did the same with the teal paint and gold highlights.  Now they are ready to used as embellishments once they are dry.

IMG_4893

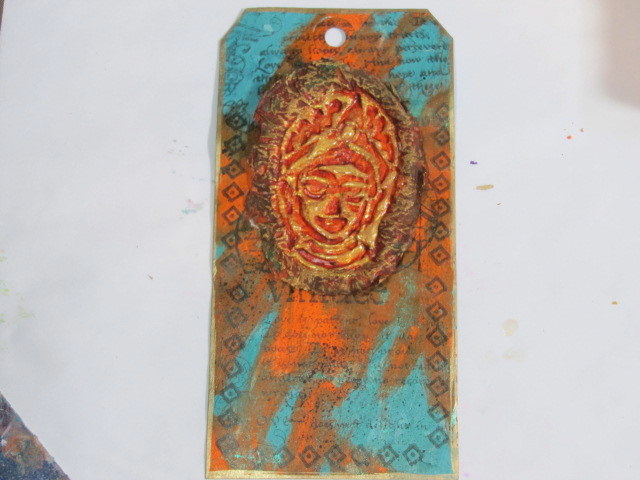
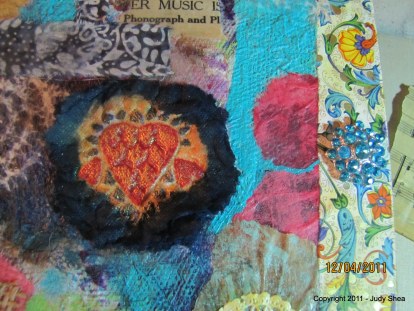
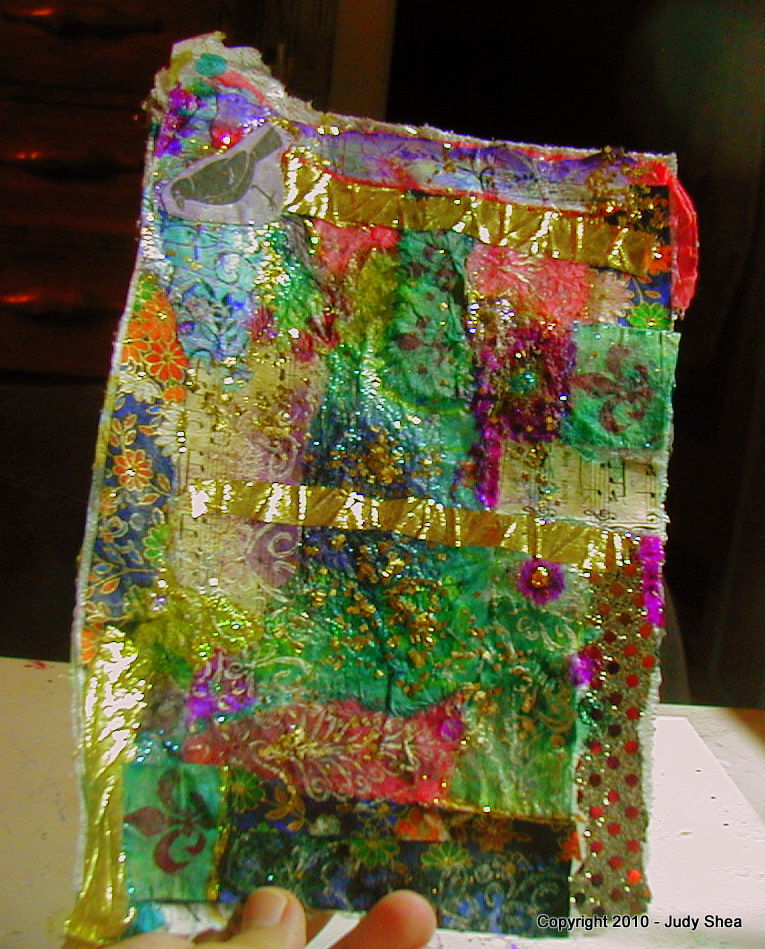
I used Krishna for a tag and the Mezuzah for the top of one of my soft journals I sewed out of paper towels. Really.

IMG_4897 IMG_4909

These are easy supplies and I’m sure you have them in the house.  You can used watered down glue instead of medium.

I had a lot of fun with this simple technique and what a great excuse to get me back in the studio. Even though it took me 2 months to getter done… right Jessica?

In my last post, I mentioned giveaways.  As I said, these supplies are gently used and I want to give them another home. I either already have a duplicates or I no longer use them.  Here before you, my lovely peeps, I have a flower stencil, a piece of an orange barrier/temporary fencing, which I use as a stencil. I was given to me by my friend Corrine Gillman. Thanks, CG. Also coasters from my collection to make art on and some beautiful decorative napkins for collage.

IMG_4918

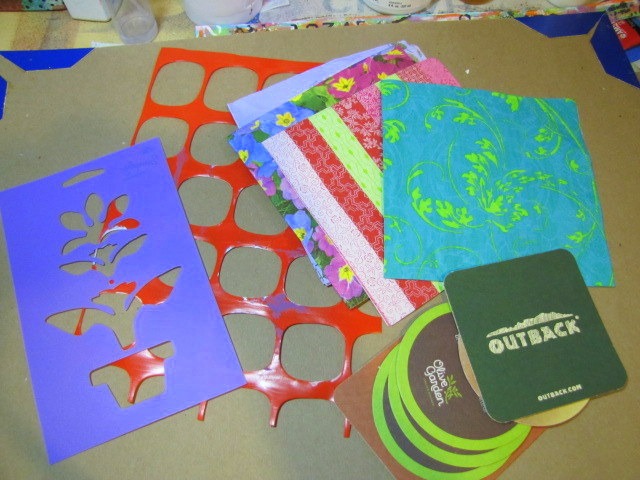
Crossing fingers that you win.  I’ll pick a winner by next Friday, June 5th.

Thanks for visiting, commenting and being fantastic subscribers.

Judy   

Creating an “Artpron”

Standard

I know, I know.. where have I been, right?  I’ve been on an unplanned art hiatus, I guess. We all know how life gets in our creative way, at least for me. I’ve always said.. I can juggle 10 balls in the air, but not 11. Crash, boom, sizzle.

Right now the most important thing is I have a post and it’s a cute one.  Yay!!!

I said to myself.. “today, no matter what, I am going to do some art”.  Alone….. in my art bubble.

I bought this teal (surprise) apron from IKEA with the intention to make it my art apron.. my “artpron”.

Let’s get to it, shall we.

I also decided to paint outside in this beautiful weather.  I gathered all my supplies and went on the deck.

There are a lot of pictures, so hang in there with me.

IMG_4625    IMG_4627

Since I already loved the teal background color, my intention was to stencil and stamp all over it. I didn’t bother using fabric paint, since I figured I won’t wash it. I used basic acrylic paints, by the way.

But, I started with StencilGirl stencils.. then more of other stencils.. old fashioned doilies, rubber stamps. Well, I’ll let the pictures tell the story…..

IMG_4629 IMG_4630 IMG_4631 IMG_4632 IMG_4634 IMG_4635 IMG_4636 IMG_4637 IMG_4638 IMG_4642 IMG_4643 IMG_4648 IMG_4647 IMG_4644 IMG_4649 IMG_4650

Did you notice any of the StencilGirl stencils?  Let’s keep going…

IMG_4655 IMG_4656 IMG_4657 IMG_4658 IMG_4659

I have so much fun letting loose.  I was happy… here is the result….

IMG_4665

Love having you by my side for these posts.  Thanks for always responding and supporting me.

Can’t believe August is approaching us already.  Stay safe and wear your sunscreen. 🙂

Judy ♥  ♥

Fun Finds, Wood Blocks and ‘bellishments

Standard

Hard to believe that just a few weeks ago, we were melting from the heat around here.  Amazing how fast it changed.  Ok, ok.. so I already put my heat on a little… and I put on my electric mattress pad at night to warm up my tootsies. Ahhhh… one of the BEST inventions, I tell you.  “Honey, keep your cold toes to yourself”.

Well, I wanted to share with you some cool finds I came across at Michael’s.  They have a table full of marked down costume jewelry.  I bought a few to use in my work.  Here a bunch.  Aren’t they purdy?  I’m sure I will find a place for them in my collages.

Next, my new friend, Nancy, (love that I can say “new friend” in my 50’s) sent me, along with some other goodies, these pieces of jewelry.  I just need to lock myself a way in my studio for a week.  Just bring me bread and water.. ok ok.. some chocolate too. Who am I kidding.  I’ll come out to eat.

So, with all these new embellishments, I decided to make a few more of my own.  I love making these.  As you can tell, I just love the turquoise and the reds.  Oranges are great too. It all depends on what looks good with the staining.  Read on.

Hearts is what I went crazy with. Oh, and of course, I love the faces.   I made some tiny birds also, along with a pair of wings.  The ” ‘bellishements”, are made from polymer clay.  They are impressed with texture sheets, buttons, jewelry pieces.  Anything with texture really.  You have a cool pattern on the bottom of your shoe.. bam, texture.  You have a cool door knob .. bam, texture.  You have a cool embossed place mat, coaster, piece of hardware.. bam.. texture.  Look around you, it’s there.

However, recently an artist blogger friend did a post on some wood blocks that she got from a couple of co-workers.  Read Autumn’s post HERE then read more of her posts.  Her journal pages are to die for.  So, I thought I’d search out the import store (Ganesh Imports)  they got the blocks at and found a store in Newburyport, MA (where I go often).  Off I went and found some great wood blocks.  Thank you, Autumn for your post on this.  I would have never known about Ganesh.

Here is my find… the big one is about 2″ round.

Love them.  Have you ever seen a carver make a wood block?  Once you see it, you will appreciate it the work that goes into making just one block.  Take a look here.  Talk about patience.. poke a needle in my eye.

So, I decided to make few “medallion-like” ‘bellishments out of one of one of the blocks… the bigger one.

Take some polymer clay, get it soft, roll it up in a ball and press it out into a circle shape.  Then so the clay won’t stick to the wood, I put some cornstarch in an old t-shirt, tied it up, like you see below and pounced on the wood then lift and separate.. hmm, sounds like a Playtex commercial.


Now, bake in a dedicated clay oven per the directions on the package of clay.  (Note:  Go here if you are concerned about using your kitchen oven to bake clay).  Don’t burn it and tent it and you’ll be fine.   I like to use either “Premo” or “Fimo Soft”.  Once baked and cooled, I stained it with brown acrylic paint. Smoodge it in the deep textures, then wipe off gently with a clean paper towel, letting the paint stay in the grooves, let dry.  Then I take a sealer (I used Future Floor Wax) and brush one coat on, let dry.  That’s it.  Now you have your own ‘bellishment to use in your collages, journals, etc.

You can check out my step by step button’s tutorial I did HERE.


Now, let’s go back a couple of summers ago on my trip to Martha’s Vineyard in Edgartown.  I actually found some wood blocks there at a place called “In the Woods” (they do not have a website).  These puppies can get expensive, but they are worth it.  Here’s my purchase.  The bigger ones are about 6″ x 3″.

Can you stand it?  Aren’t they so much fun.  So different than any other rubber stamps out there… BUT I must say this…
They are made for fabric, not paper.  It can be done, but, you need to have some cushion under your paper when you stamp.  I just used a folded up piece of fabric or paper towel.  I just love using them to texture my clay.  LOVE. 

The other use for them is paper casting.  I use tissue paper for my casting; the kind you blow your nose with.  Here’s a look at some of the castings I’ve done…

This won’t work with detailed rubber stamps.  You can see the deep lines that really define the tissue. When the tissue is finally dry, you can paint and stain the pieces.  Use in your art anyway you want… Made by you.

I used one casting on one of my book covers.. The dark blue circle with the read heart.

I’m getting ready to venture out to Art is You.. in Stamford, CT Columbus Day weekend.  It’s my first retreat that i’m going to.. alone.  It’s always fun to go to these things with a friend, but it didn’t work out this time.  However, I’m sure hoping to come home with many new friends.  I mean, not with me, of course.. HA! .  I’ve heard that is retreat is something special, one of the best.  So, here I come.  I’ll be taking pictures and blog about my experience.  I’m trying to make a bunch of ‘bellishments to take with me.  I’m thinking 100.. yikes. Better get moving a little faster.

Well, I’ve filled up your brain with a lot of info tonight.  I’ll be doing a tissue paper casting blog or video soon.

Thanks for stopping by and visiting.

Judy ♥ 

Mixed Media Collage Tutorial

Standard

I so enjoyed the 3 day weekend that just passed.  I was hot here in Mass.  A little too soon for me, but that tends to happen here.. not much of a Spring and then wham.. summer.  Give me a cold rainy day and I’m happy.  Strange, I know, but very comforting to me.  Whatchya gonna do?  Make art… that’s what… and that’s exactly what I did.

Here’s a tutorial just for you on how I made a collage on Bristol paper.  I started out thinking I would work on 3 collages at the same time.  Two on Bristol paper and one on deli paper.  The idea was to work on one while layers on another were drying.  Well, I started out that way, but there was too much going on and I couldn’t keep track of all the steps of the techniques.  I ended up focusing on one page for now.

You’ll see that I tend to lean more towards the teals, as in my other work too.  See this post and you’ll see what I mean, jelly bean.

Supplies/Materials:
Golden Gel Medium
Bristol paper 11″x14″
Golden fluid acrylic paints
Claudine Hellmuth Studio paints
scrap ephemera
polymer clay handmade embellishment (gotta have the clay in there)
lace papers
ink jet image transfer
my own hand carved rubber stamps
Portfolio Oil Pastels

Let’s start by showing you some of the handmade stamps I made.  Ok.. let me also tell you how I (bleep swear) at carving.   So they are not perfect and my back and neck  and eyes were sore after hours of carving, but they are my own originals.  Now, if you want to see some beautiful hand carved stamps.. go visit Autumn Hathaway’s website.. she is the queen of carving stamps.  She even has her own stationery line.  Gorgeous!

Here are mine.. aren’t they cute?  The pink ones are the ones I did this weekend and my own designs.

CLICK ON ALL IMAGES FOR A CLOSER LOOK

So, I started with the paper and scraped down some turquoise paint with a credit card.

Then added some Quin Azo Gold…

I used a little of the studio paints for patches of red.  More layers of turquoise and then I gave the entire page a wash with Titan Buff.  Ahhhh.  Let dry.  Actually, let all layers dry one at a time.

… and now, my friends… I begin the fun process of collaging.

I start the design using one of my stamps (love saying that).

STOP!  Wait a minute.. what time is it?  Did I forget to make dinner?  Um, ya, I think I did.  Ah, heck…. everyone for themselves; leftover night.

Continuing………. More of my stamps, scrap papers, corrugated cardboard from a coffee cup sleeve; stamped with red.

Added an ink jet image transfer from a transparency.

More papers, and stamps and lace papers.  Lace papers just melt into the collage when you use gel medium.

Here I put a strip of masking tape to protect the page from paint so I could put in a black and white stripe… then pull of to reveal a perfect line.  Love this.. makes me happy.

Here’s what it looks like before I start using Portfolio crayons.

I rubbed the black crayon around the edges.  I also used orange, teal, yellow and white crayon around the page.

Here’s the final.. I added a handmade polymer clay embellishment on one of the leaves. Also added a piece of my handmade tar gel skin with beads and glitter (right next to the spiral lace paper).  I cut about a 1/2″ from all around the edge of the page and snipped the corners.

Here are a couple of closeups…
  

There you have it.  I’m going to shoot for different colors on my next collage.  Ones that I don’t usually use.

Hope you enjoyed my tute.

Don’t forget to rate and  “like” me if you enjoyed this.

Thanks for stopping by.

Judy

Big Bold Backgrounds

Standard

As I continue to do some Spring cleaning in my studio, I took a large piece of Wausau paper out the the wastebasket to give it a new life.  I thought, what kind of Mixed Media Artist would I be to throw this away.

I began to spread paint around with my old gift card, which make great small paint pallets by the way.  Layer after layer of colors.  If I didn’t like a section, I simply painted over it with white paint.  This was a big background about 14″ x 11″.  I love the size and decided that it will become a large journal.   Since I only had the one large sheet, I had to make another to make a book.  I had some white poster board lying around.  Poster board paper.. the kind you used/use in school for projects… takes a lot of abuse with paint, water, gel medium.. really standing up to what I was doing to it.  Actually better than the Wausau paper.  Samantha Kira Harding gave me that tip a long time ago.. Thanks, Samantha!

Here is a look at them so far.  I say “so far”, because I know that I’ll end up putting some fabric on their or some polymer clay pieces.   Click on the picture to enlarge, then click again for details.

Cobalt Teal paint (Golden Fluid Acrylic) played a big part in these pages.  Just my favorite color.  I also used Ranger/Hellmuth Studio’s “landscape green”.  That combo is perfect together.  I used heavy body white acrylic paint to spread through stencils, did some transparency transfers, rubber stamping, charcoal stick.

Few more section shots.. click to enlarge.

I also purchased some dauber bottles for paint… they are actually BINGO ink bottles.   In the past I bought the dauber covers that can go on any basic acrylic paint bottle (ex: “folk art”).. but I did not like those.  I was always banging the bottle to get the paint flowing

Here are 3 that I made.  Cobalt Teal mixure with water and a little Golden Glazing Liquid.  My own version of green and Quinacridone Nickel Azo Gold.  All three of these colors are on the pages above.

So, my next step is to get hold of more poster board paper and make the inner pages… then binding it.  Not my thing, binding/sewing journal pages.  We’ll see how that one goes.  Stay tuned for more…

Thanks for stopping by.

Judy

Mixed Media Citra Collage Tutorial

Standard

Last year about this time I did two posts on the beautiful Autumn that we had… you can see the posts HERE and HERE.  Well, that was last year.  This year is a different story.  I have no pictures because the colors are dull this year.  The summer was so hot for so long, the trees just got too stressed and couldn’t generate enough chlorophyl.   I guess that’s like us really isn’t it.. sometimes?  Dontchya think?   Let’s hope that next year it comes back in full force with beautiful backgrounds.

Speaking of backgrounds… I wanted to show you a very cool technique that’s been shown here and there using CitraSolv.  It’s a degreaser used for household cleaning.. well, check it out HERE.  Then check out the CitraArt HERE.  Pretty darn cool if you ask me.. go ahead ask me… .. It’s funny you should ask… Yes, I thinks it’s so cool that I made a mixed media canvas collage with it.

Let’s start from the very beginning.. …(wait do you hear Julie Andrews?)  Sorry.

I looked all over for a bottle of Citra Solv.. nothing in the local stores even though the CS website listed the retail store locations.  So, I finally found a bottle at Vitacost.com.   Citra Solv works well with the National Geographic magazine pages the best, as it is contains a clay coating used for the crisp images the magazine is known for.

Moving on….

Here are the steps I took to make my Citra Backgrounds.  Start with your bottle of Citra Solv and a Nat Geo magazine. Now, you may want to work with a window open or go outside.. it’s not a terrible smell.. just a very STRONG orangey odor.  I got sick of it after a while.

I put my CS in a small plastic spray bottle instead of using a brush.  I thought it would be easier to spray.  I started to use a small plastic “solo” bathroom cup and a brush to spread it on and this is what happened…

Ummm.. apparently the plastic in the cup did not agree with the CS.  However, this plastic spray bottle is fine…

Let’s begin… can you stand it????

Open the magazine to some colorful pages and begin to spray.  Spray, turn to next colorful page.. spray,  next and so on…  now don’t be stingy with the liquid.. if it’s drippy that’s ok…

See how it begins to “melt”.. oh so fun.

Spray all the pages you want and close the book and let it sit for a while.. at least 15 minutes.. if you don’t see a change when you open the page.. spray some more and close the mag… some pages are better than others…. BUT oh look and see some of my results…

Do you see where I have the pencil pointing above?… I saw a face in that blotch and I started to enhance it further.  Look for images and play.

Above, I started to rubber stamp and play with the face.

So, there you have the way to make the Citra Backgrounds.  Now, let me show you how I applied it to a new mixed media canvas piece.

I started with a blank canvas, put down some fluid acrylics, letting each layer dry.  Then on the far right I put a large strip of heavy acrylic paint.

I let it dry then put my heat gun to it really close.  This will make the paint react with the intense heat and start to bubble… I got this technique from Gary Reef.  You’ve heard me mention him before.. such a love; you can see the video HERE.

Look at that beautiful texture.  I’m excited now.  When you are happy in bubble town, let it cool down (that rhymes, by the way).

I painted the white with gold acrylic paint and heated it again causing more bubbles… and then another layer of gold…

Once the paint was dry and cooled, I put random ripped masking tape over the gold.

Then painted it red then pulled the masking tape off revealing the gold underneath.

I DIDN’T LIKE IT…I needed to tone down the red.. just wasn’t working for me.

So, I painted the gold over it…..

Close up below.. love the texture…

OK… let’s get on with using the Citra Backgrounds….

So, here you can see the citra pages on the left and going up and on the top… Did a little rubber stamping on them and “antiqued” with some brown shoe polish around the edges..  On the bottom is a ripped resin music page.  It’s coming along, but still needs some lovin.

Ah Huh…. one of my favorite techniques.. pushing molding paste through stencil… Here, I tinted molding paste with black acrylic paint.. and mixed to make a black paste.

A little boo boo on the top left of the fleur-de-lis.  I’ll need to let it dry and redo that section.

Below is a picture after the fleur-de-lis was done and I added some gold trim along the red strip, hand made polymer clay embellishments, ribbon and gold paste that I rubbed over the molding paste design.  People, I’m just in love with Inka Gold waxy paste by Viva Decor.  I can’t get enough of it.

Here is the last picture I took.  At this point I’ve added, black tissue paper, black stenciling, fabric, lace paper and I blinged up a boring metal pendant.  However, I have to admit.. I know it’s not done.. it still needs a final image above the music paper.  It’s look very royal.. maybe a queen?  Beeswax?    What do you think?

I had so much fun creating this piece.  Hope you enjoyed the post and tutorial as much I as enjoyed creating it for you.   I’ll show my final canvas in my next blog post.

Thanks for stopping by.

Judy  ❤

Buttons & ‘Bellishments

Standard

Hey Bloggerdoodles….

Been a bit busy in the studio lately finishing up some pieces and oh ya, working full time.  I didn’t get a chance to blog last week, so sorry about that.

I wanted to shout out about my upcoming workshop here in Massachusetts at Scrapbook Cupboard in E. Bridgewater.   I am so looking forward to a fun class that I know everyone will enjoy.

I’m calling my class “Buttons and “Bellishments”.  Get that?   Bellishments instead of “embellishments”?   Hmmm. ok.    Here is a look at the samples I made for the class.

Look how purdy…

Buttons and embellishments made from polymer clay for all your mixed media, journaling, fabric and scapbooking with and edge, needs.  We’re gonna stamp, texture, glue, rip, antique and adorn these puppies and you will be so excited to walk away with as many as you want until you run out of clay or energy, whichever comes first.

If you are local, please join us for a fun day of making your own ONE OF A KIND pieces.

Check HERE for details.

.. and as always, thanks for stopping by.

Judy

Next up.. I’m still pondering that… maybe some resin paper???

ATC Workshop & Renewed Friendships

Standard

Hey Bloggeroonies…

I recently did a workshop in Rhode Island to my dear friends from the Rhode Island Polymer Clay Guild.  I had stopped going to meetings there a couple of years ago, but was invited back for a workshop after the board members saw my blog.  We also have kept in touch since I left.

I was honored the asked me to teach my ATC workshop.  They were elated that my friend, Karen (you can see her post of the RI visit), and I returned for a visit.  In our honor, they had a buffet lunch and at the end of the day, and because I taught the workshop, they presented me with a Zentangle print shown below. Each of them did a square tangle and they had it professionally printed on one large board.  Seeing this in person is more amazing.  I love the one on the bottom right.. look at that little cat… can you see it?

Here a some pictures of the gang and their ATC’s.

BRAVO, ladies.. they came out gorgeous!!!!!!!!!!!!!!!!!!

Here’s a call out to Toine, Bobbie, Sandy, Christine, Tricia, Arlene, Ilene, Rita, Tamala, Dora, Sarah, Toni, Pat, Sheila and my partner in crime, Karen.

Thank you all at RIPCG.. you are one terrific group of creative souls.   You haven’t seen the last of me.. I promise.

Thanks for stopping by.

Judy

Next up…  Martha’s Vineyard, here I come (may not post next week).
When I get back… what I’ve been up to in the studio.

Dryer Sheet Collage Art Cloth – Tutorial

Standard

Hey Bloggerdoodles…

I finally finished up my dryer sheet collage art cloth for you.

This process is so fun at at the same time, you are recycling your dryer sheets.  I hope you like it.

What you need: used dryer sheet, white glue, water, freezer paper, masking tape, brush for glue, paints and inks,  scrap papers, fabrics, ribbon, glitter…. just any kind of ephemera to make your layers and what makes you happy.

Tape a sheet of freezer paper, shiny side up to a piece of card board (taping it down to your work surface is fine, but if you use a piece of cardboard you can move it while it dries).

Mix glue and water in a separate container using a 1:1 ratio.  I play with it until it’s a syrup consistency.   Lay down the dryer sheet and pour the glue on the sheet and start to spread it until it’s all covered.

Here we go…. Let”s have some fun, shall we?

Now, you can start with anything you want, but here is what I did….

I started  laying and gluing down decorative napkins, tissues papers, fabric, ribbon and thin papers.  Don’t hesitate to use too much glue.. this will all dry clear and give the cloth strength.  Keep in mind, you are working on a very thin, transparent substrate; it’s needs the layers you’ll be adding to it.

Then I dripped alcohol inks all over.  You can use glitter spray too or acrylic paints to make your own free form designs.

It’s getting there.  Just keep adding, layers until  you are satisfied.  Press down the glued pieces, making sure they come in good contact with the layer below it.

Here’s what it looks like when I’ve completed piece.  I added glitter and gold ribbon.   I am a gold-aholic.. I admit it.  Nothing seems done until I add some glitter and glam to it.  Tip:  Go to the hardware store and buy a small bucket of ceiling glitter; it comes in gold and silver.

Once your done, put this aside and let it dry several hours.. even 24.

Peel it off of your freezer paper and now, you’ve created a one of a kind, all your own design, collage art cloth.  For some last minute, I think it needed something else, addition, I used rubber stamps on it once it was dry.

Oooooooooooo….. ahhhhhhhhhhhhhhhhh.. lookie here…..

It is completely flexible.  You can cut it to you own shapes to add to your canvas art, journals, snip pieces to make greeting card designs.. it’s your world… go for it..

Click on each picture for a closer look.


Take a look at the back of the cloth… pretty cool too.

Thanks for joining me and stopping by.  I do hope you enjoyed this tute.

Judy

Next up:   ATC workshop and renewing friendships.

Workshop Success!

Standard

Hey Blogereetas…

Well, my class was a success.  I guess I would measure success on that it was relaxing, my students/artists were so talented, social, humorous and down right fun.  Thanks, Kristen, Raine and Susan for making it easy for me.

The class was scheduled for 3 hours, but we could have gone 4.   The books just came to life with each step they completed.   We could have used about 30 more minutes, as 2 did not finish their books.  They promised to finish at home and send me pictures.  I’ll be expecting them, ladies.  Don’t make me come over there.  I’ll post them as soon as they do.

Here are some shots of the day and their work.

First, introducing our Hostess at the Scrapbook Cupboard, Bev.  Thank you so much for being wonderful and bringing me in to teach.

If you’re in the area, please stop by to visit and/or take one of their great classes.

Here’s my class, aren’t they cute?

Artist’s work in progress.  I wasn’t able to shoot more pictures than this, but this will give you the flavor of the class.


What fun!!!.. and Bev made us eat chocolate.

I’ll be back at Scrapbook Cupboard in September to teach my Buttons, Embellishments & More Workshop.

Thanks for stopping by.

Judy

Next up…. Dryer Sheet Collage Paper