
It’s been quite a long few intense months at work here… hence my absence. It’s calmed down now and I am determined to keep up my blog and do some art for ME an StencilGirl.. and today with Lost Coast Designs, too.
We have a great blog hop today and you’ll be able to visit with all my art friends in a minute. But before I let you go hopping and to an amazing giveaway, I’m gonna go creative on you or should I say “clayative”. Oh, good one, Judy. Let’s see what we can do with rubber stamps and stencils.
Rubber stamps first.
Today, I are making ATCs+ (Artist Trading Cards) The “+” means I’ll be putting them on stenciled coasters; so, my version of presenting ATCs a different way. I’m making them with polymer clay using Lost Coast Designs rubber stamps. Rubber stamps and clay have a great relationship. I’ve been pushing stamps and textures into clay for years and I never get tired of the result.
I love the look and color of natural/beige clay. It’s very wood-like to me, especially after I stain it. So, I have conditioned some Fimo Soft clay by softening it with my hands then running it through the clay dedicated pasta machine. I have to admit, I was NOT happy with this clay this time. It just wouldn’t soften up like I wanted it to. But, I managed to get what I needed, and I had to make do with a result I didn’t like. Friend and great artist, Carolyn Dube, calls them, OOPS – “Outsanding Opportunities Presenting Suddenly”. Indeed it was. Read on.
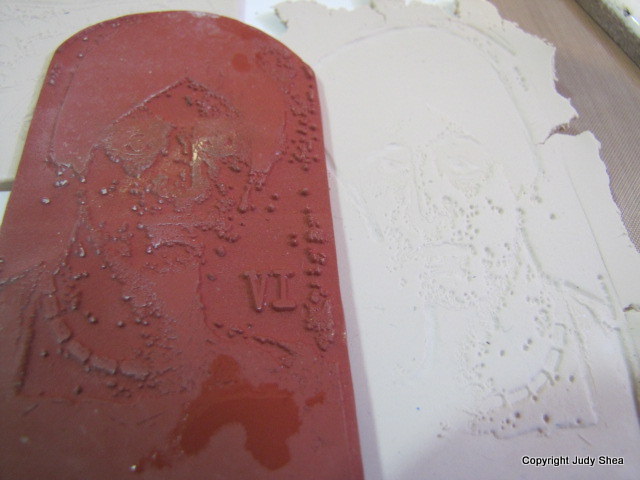
Let’s start with the rubber stamps the Lost Coast Designs sent me. I chose birds and a face. I also chose unmounted, because the rubber stamps are more flexible and easily pushed right into the clay.
Spray the clay with a little water after is flattened. I used an acrylic roller. I gave it a sturdy push as I rolled.
(CLICK ANY IMAGE FOR CLOSE UP)


I created a template the size of an ATC (3.5 x 2.5″). Lay it over the bird image and cut around the center with a craft knife. Lay plastic wrap over the ATC and just rub around the edges to smooth it out. Note: You can use a playing card as a template also.


I did the same with another bird and the face. I decided to take my “difficult” clay and let it look uneven, like a shard of some sort. I did this with the face. Not a true ATC, but hey, my world, right? I took some of my favorite buttons and impressed some texture into the clay around the images. Time to bake. I used a ceramic tile and baked in a clay dedicated oven. Follow the package directions for timing. Let the clay cool and now it’s time to stain and paint.


Antique/stain: I took brown acrylic paint and rubbed it into the now cooled clay and then wiped it off with damp cloth or paper towel. Just look at the images come to life. Lookie see.


I painted the first bird with cobalt teal acrylic paint, let dry and the same with the to other bird, but I used red acrylic paint. For the woman’s face I started to paint her hat and lips. I manipulated the image a little with tools to bring out the eyes and lips a bit. I mixed the paint with a little glazing medium for a bit of a shine. Once the paint was dry on the birds, I put a wash of brown paint and water and rubbed it over the words in the bird’s body so they would appear more.


Once the paint was dry on the ATCs, I gave them a sealer coat of Diamond Glaze. Let them dry.


I wanted to give the ATCs a little flair. I opened up my rhinestone tray and give them a little bling. Then I used glitter glue to go around the birds. I also took a Krylon Paint Pen and went around the edges of the clay.


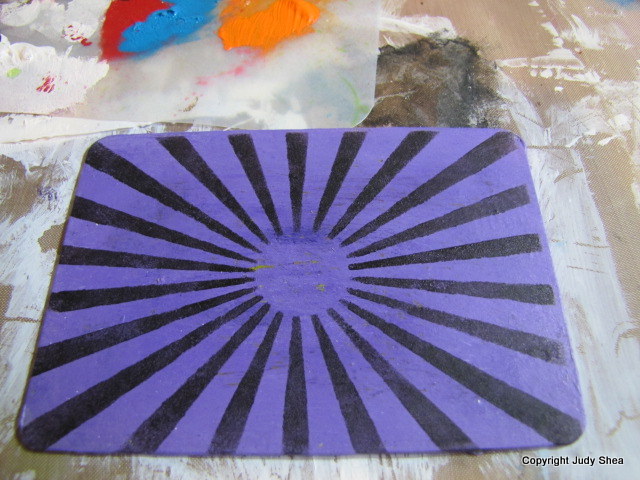
Now, onto the stencil part. I used 3 StencilGirl stencils.. Scales by Jessica Sporn, Circle Rays by Michelle Ward and Mandala by Mary Beth Shaw.
I took 3 beer coasters and gave them a coat of heavy gesso. I painted them with acrylic paint to contrast with the image colors. You’ll see I used green, but me no likey. I changed to purple later on.


I stenciled the coasters with each design, using a make up sponge with acrylic paint. I then put a coat of Collage Pauge to seal it and give it a deeper look. Love this stuff.. no sticking after it dries.


I used Posca Paint Marker Pen to add some doodling. Then I glued the Clay onto the coaster. Added a few “bellishments” that I made.


Final results. Click on images for close ups.


Wasn’t that fun? Ready for the giveaway???

All comments on the hop are eligible for the giveaway. The more blogs you comment on, the more chances you have to win. Giveaway will close on Sunday, March 30th @ 11:59PM Central.
Now, it’s time to hop on over to see what Bibiani created.
StencilGirl Talk
LeighSBDesigns
Mary Beth Shaw
Mary Nasser
Cherri Robb
Judy Shea (that’s me… next is Bibiana)
Bibiana Martinez-Ziegler
Linda Kittmer
Carolyn Dube
Leslie B. Turner
Janet Joehlin
Karen McAlpine
Leslie Tucker Jenison
DominoARTblog
Lindsay Weirich
Maria McGuire
I hope you enjoyed the ATCs and this blog hop.
As always, I love hearing from you and let me know if you have any questions. Thanks for your patience and sticking by me as I continue my balance of life, work and art.
Judy ♥ ♥ ♥

Wow Judy, I love how you incorporate clay into your art. These are great.
I liked these a lot, though I don’t think I have the patience for all the steps.
Love your clay work! I have never tried it before and you make it look so easy! Thanks for sharing with us!
love your atc so beautiful thanks for sharing and the lovely giveaway
Love these birdies. Love your clay crafts.
I love seeing everyone’s process – gives me inspiration. Love this Blog Hop thing. I will have many new places to check out – I may never get away from the computer.
So very cool. I really admire your level of creativity given alllll that you do. (grin)
Wow! Exciting stuff!
These are fabulous, but then I know that about you oh talented one. Love the bright colors. xox
Loved the birds!! so much fun to see what everyone does with things…Smiles, Ruth
terrific project and all those great step by step photos!!!
stamping sue
http://stampingsueinconnecticut.blogspot.com/
You crack me up. I so enjoy reading about your process. I feel like I am with you 🙂
They are fantabulous!!! To be honest, I never would’ve thought of doing this 😦 your creativity astounds me. Thank you for this opportunity
What a great tutorial Judy!!! Love how you incorporated everything together. Lovin’ that bird 🙂
I like the birds!
Love stencils!!! New ones would be Awesome!!!!
As much as I love Stencil Girl Stencils; I love Lost Coast Designs stamps just as much! The detail and variety of their stamps are just incredible! I own several but I’d certainly love to have more!!! And the fact that you used polymer clay? I LOVE IT!!
Interesting medium with nice result. Thanks for sharing your unique idea.
Really like how you used the stamps on the clay! The projects turned out so cute and whimsical. I would put them on my coffee table!
I’ve only dabbled a tiny bit with stamping onto clay of any sort. These ATCs would make great magnets or even ornaments.
love working with polymer clay! thank you for the post and the blog hop! 🙂
You are my Polymer Clay Queen, Judy, and you have not disappointed with this great tutorial today! Love watching things “evolve” on your work table. I most often love the journey of getting there as much as the final product. So much yet to learn….
I love this! Now I want to make clay ATCs. I make a lot of regular ones on baseball cards, but have never seen a clay one, or thought of that as a medium! Thanks! I’ve grown today!
You ALWAYS make me want to get out my clay. Then I see canvas and paper and I get distracted.
Judy your creations are stunning. Thanks for sharing how you used the stamps with clay. Love the finished projects.
I’ve never done clay so stop tempting me….or pay for my divorce attorney.
Oh gee, oh gee, love your colors as always! Sweet red bird with the TURQUOISE feathers!
I
amazing project! love that idea of the clay!! I have never tried myself!!! thanks for the lovely comment on my blog too!
I am so glad to be participating along your side in this Blog Hop! it is so much fun!
Bibiana (DTM Lost Coast Designs)
Great project!
Uh, oh … thought I wouldn’t catch the clay bug, but this project is just too cool! Now, where can I hide a pasta roller …
That’s a lot of work for an ATC card. I’ve gotten myself into a swap and need to make 12!!
great work with the stamped clay and the stenciled coasters. love the birdies. thanks for an opportunity to win new goodies.
Wow,this is DIFFERENT! and absolutely funky and fun!
Clay ATC’s love it
Yay, Judy!
So glad you’re hopping with us!!
The things you do with Fimo and stencils…and now rubber stamps…knocks my socks off! You rock!
What inspiring artwork! I love how you incorporate the stencils and stamping on the clay.
but great you are! artist! thank you for this fantastic tutorial!
AWESOMENESS!! I too love using stamps with clay and I love how you made coasters with them! Fab decision to change from the green to the purple ;0)
Awesome I love the layered clay atc
working with clay is on my bucket list of mixed media techniques to try. I love the bird stamped clay piece. thanks for sharing your ideas.
Wow, what a great idea! And the clay panels looked so fab mounted on the coasters.
It’s certainly helpful that you included so many how-to photos along with your write-up. Thanks!
you ALWAYS think outside the box and i love when you are in the blog hops, always amazing what you come up with. thank you so much for the inspiration and great use of products. just love what you did. can you tell?? xoxox
Love your ATC+ artwork! I used to work with polymer clay a lot, but haven’t used it in quite some time. You’ve inspired me to get it out and play with it again! I’ll probably have to get some new ones though 🙂
The clay bird is very impressive and so is all the other work that you did. Your talent is amazing
Barb J.
NC
I love blog hops. Stamps and stencils, I’ll be hopping along blog to blog.
Fabulous idea, love it.
Love your techniques!
Great project! Love the stencils and stamps used. I love Lost Coast stamps. Thank you.
OMG… I’m just flabbergasted! What amazing projects! SO glad I re-visited this evening! Very happy for the opportunity to participate in this blog hop with you!
Hugs,
Leslie, DT
Love To Scrap!
Love To Scrap! Challenge Blog
Girrrrrrrrrlllllllllll…. you are the Queen of the Clay! And I just adore that new term ‘clayative’. So Judy! Chop chop and have a wonderful time with Jessica this weekend. I know you will!
Judy, hi! Thanks for your compliment on my blog. Right back atcha!!! Your instructions are the best! And, I loved how you used the sunburst stencil. Artfully yours, Cherri
Love your work with clay and stamps! Truly inspiring!
Stunning! Wow!
Great ATCs. Do you trade? I haven’t any luck with Fimo, maybe I should give it another go and stamp it this time. 🙂
I love your use of polymer clay. I keep thinking I need to try playing with it…your work always inspires me so much!
Great ideas!
The colors and textures work so well with the clay!
WOW, what a lot of fun you went thru for your project!!! Well done!
Jan
What a terrific project! love the bird ATCs
Wow Judy…what an interesting piece of art…I had never seen someone working with stamps in clay like this. It is very imaginative!
I never would have used clay with stamps, awesome!
The textures in your work are awesome as well as the colors. TFS
Judy you always have such great detailed tuts! thanks so much- and such a fun piece!
Inspiring idea!!!
Love it!
What a great idea! I have never worked with polymer clay, but I see I have to give it a go! Thanks for the inspiration!
Love the recycled coasters and the look of the stained stamps in clay. Thanks.
I don’t usually creat ATC but this tutorial just might get me going:). Thanks for sharing!
Judy, I never worked with Fima clay, this sounds like a neat way to use my stamps, adding more dimensions, thanks for the idea…..this is beautiful!
Marvellous use of these stamps and stencils. Such excellent info on this technique…I’ll have to try it.
love, love your ATC’s
Thanks for a great giveaway!
Wonderful techniques! Thanks for the inspiration.
superbe projet!
merci pour ce blog hop!
kisses
coc♥
Wow – so creative!
Swoon! I’ve never seen a clay ATC before. Thanks so much for introducing all the beautiful possibilities. I love your work!
Awesome projects! I don’t usually work with clay, but this makes me want to try. I like your site. My first time here.
I love to see what others are doing with polymer clay. Your work is so lovely. Your site is awesome. Thanks for sharing your creativity.
Fimo you go girl, fun abit playful, new..Great instructions….
always wanted to try clay of some kind. Thanks for the inspiration
Wow. I love how you used such a variety. Candy
Love these pieces! Very colorful and fun!
What fun little pieces of art!
What fun! Gotta love the birdies!
Thanks for the step-by-step, and with pictures!!!! Love the work.
I think these are the coolest things ever. I loved being surprised as I read your process not sure where you were going at first (since I haven’t worked so much in clay), then at the end, the two things put together–voila! It was great. I noticed Jessica Sporn uses some clay pieces she made in a class with you and they make wonderful elements in her mixed media. So just love this Judy. Thanks so much!
Too Cool! I loved these ATCs. I will definitely give this a try. I have lots of coasters to play with.
Wow! Brilliant!
Very very cool – as a flayer I’m totally in love. Rolling along…
Wonderful idea! I want to try this too!
i cannot believe how awesome your art is! i also can’t believe that i never came up with that idea, u are so clever and talented! tx for sharing and inspiring, aloha, angi in hana
Cool idea. Goes on my to try list
omg crafts and food………. oh my goodness i’m in love!! great blog and tutorials/ideas…..i will be following you!!! so many things to look at thank you so much……….love your blog! i would love to win some supplies i want to get back to making homemade for my loved ones and friends! they used to love getting handmade goodies from me. i love everything crafty, diy, creative, artistic,.and food/recipes, i must have a million or more… and thx for the stuffed grape leaves…….havent had them in ages and never made them, but now i can thanks to you!!! 🙂
wow. even my son thought these were cool, and he’s a teen ager 🙂
I admire your work in clay! Awesome.
TFS
Grandma Nancy
Thanks for giving us an opportunity to see your artwork and take a chance on the contest.
Very cool ATC’s!
Love all that color and texture! Very cool project… great mix of stencils and stamps!
Wonderful work with clay. It is very inspiring. I would love to try my hand at working with clay now. Thank you for sharing.
love your project. very creative.
I’m glad to hear that work’s finally settling down Judy. These are really neat & I especially love that purple.
WOW! Great background… and the finished product, with those fab embellishments, is just to die for.