Welcome to another Blog Hop with StencilGirl.
By the way, did you take advantage of StencilGirl’s Cyber Monday shopping deals? Well, I’m just sayin that someone that you know who writes this blog took advantage of it and got herself some early Christmas presents, that’s all. I am so looking forward to the holiday break where our company shuts down for over a week. I plan on taking some serious time in my studio to create with my new “toys”. Wish you could join me.
Ok.. let’s hop to it.
The stencil I’m using this time is by Sue Pelletier’s called “Loose Dress #2”
I decided to make a cute dress out of polymer clay. My goal was to create a gift for a “welcome baby girl” or young girl.
I used Premo clay. I wanted pink for a girl, so I made some pink clay mixing white and a little red. It took quite a while to condition this clay by keeping in warm in my hands and trying to squeeze and smoosh it to keep it warm and soften it. Once it softened up, I let the pasta machine help me to the rest – set at the largest roller width. Probably went through about 20 passes before it was soft and pliable.
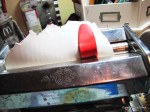
It needed to be a little bigger than the dress stencil which is 6″x6″. Spray the clay with water. Lay the stencil down on the spritzed clay. Put them through the pasta machine together, but do not hold them while they run through. The width was one size smaller than the largest setting.
If you don’t have a pasta machine you can use an acrylic roller or a rolling pin dedicate to clay (not food). Push down firmly while rolling on a piece of card stock.
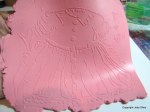
Now, take the stencil and clay and lay them down (they should be stuck together). Gently peel the stencil off of the clay. Cool, huh?
With an exacto knife gently cut around the dress form.. I am only taking the dress, not any other shapes outside of the dress form. Now, you will see that the edges are a bit rough. Take a piece of plastic wrap and lay it over the edges and gently smooth around the edge of the dress. Now it’s ready to bake. I put it on a ceramic tile. Last photo is baked and cooled.
Tips: Follow the clay package instructions for baking. I have a clay dedicated oven for baking my clay. If you do not, you can use a lined parchment paper cookie sheet. Lay the clay piece on the parchment paper and tent the clay with aluminum foil. DO NOT BURN THE CLAY. Oven vary; make sure your oven is accurate with temperature.
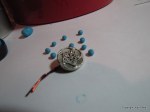
While the dress cooled down, I made tiny buttons to put on the dress. I took turquoise clay and make tiny balls and pushed each ball into an old button I used for texture. I tried to take a clear picture of the buttons before I baked them, but I could not manage a good close up. Bake the buttons. Once cool, glue them onto the dress using your favorite strong glue. Let buttons dry thoroughly.. I waited overnight.
Looking good so far, don’t you think.. soooooooo cute. Say it with me.. all together… “AWE”.
Now it’s time to “antique” the dress and make it look old and vintagy. Yup, that’s a word… now.
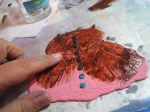
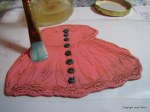
Take brown acrylic paint, and begin to smoosh it into the dress, making sure to get it into the crevices. I find my finger is best. With a damp paper towel, gently wipe off the excess paint. This may take some time, as you want pating to say in the crevices. In some of the smaller areas, you can use a cotton swab and alcohol to get the paint off.
When you get the dress to where you like it, let that dry completely. Now, it’s time to shine it up. If you had read my clay tutorials before, I use Future Floor Finish. You could also any clear sealer. I wanted to add one of my polymer clay hearts to the dress, but which one? After I glued the heart on the dress, I also glued a ribbon to the back as a hanger.
… .and here you are.. a cute little pink girly dress. Doesn’t this just look so adorable hanging up? Imagine it on a little girl’s bedroom door. You could take a white gel pen and put the child’s name on one of the ruffles of the dress also. I had thought about blinging the dress up with rhinestones, pearls or glitter glue, but I wanted to keep it simply vintage. You could do SO much with this.
Let me know if you give it a try. I’d be happy to help if you get stuck.
Time for a give-a-way – Music to my ears. Leave a comment here and on all the blogs in the list below. All comments on the hop are eligible for the giveaway. The more blogs you comment on, the more chances you have to win. Giveaway will close on Monday, December 16th at 11:59PM Central Time.
Now off you go…. next on the list from my blog is Corrine.
StencilGirl Talk
Sue Pelletier
Carolyn Dube
Mary C. Nasser
Judy Shea (hate to see you go, but I know you must)
Corrine Gilman
Linda Kittmer
Kirsten Reed
Jessica Sporn
Janet Joehlin
As always, I thank you for stopping by to visit and leave comments. Your support is so amazing.
Judy ♥ ♥ ♥













Hi Judy, this is so cute, love it!
That’s so cool. What great use of the stencil…and thanks for the tips.
What a great idea Judy! A perfect gift!
Judy, this is such an incredibly adorable gift idea! I just love your creativity, especially with polymer clay. I think I might have to get some and try incorporating some pieces into my fibre art…you’ve really inspired me!
PS. Thanks for that awesome looking chilli recipe. I can’t wait to try it!
Oh Judy, I just had to come back…have you seen Jessica’s stunning little gift box yet? Wouldn’t it just be a perfect way to wrap this adorable gift of yours and then the recipient would have a lovely keepsake box too! Now I need someone to have a baby girl so I can use these wonderful ideas!
I love this Judy! So sweet. I’m definitely on the look out for a pasta machine… I just don’t seem to get as good effects with my rolling pin…. Love what you made my friend!
Hi Judy! Love this technique. Adorable.
Judy, I love it!
love your little vintage dress – and Sue’s stencils! thanks for the tute!
That came out just amazing Judy. You make working with a large piece of clay look so easy, talent my friend, talent. xox
Very cute Judy! Thanks for the tut- !
So beautiful, Judy!
I love those sweet little blue buttons and the little heart embellishment!
Looking forward to semester break to playing with all my stencils, too! Glad to hear you get a WEEK OFF!!
I never very thought about using a stencil with clay. What a wonderful idea. The ornament is so pretty. Thanks so much for sharing this.
1-2-3… altogether…ahh…
Too much talent dripping from your fingers!
Really lovely.
I love the very unique way you used the stencil, it’s amazing to me all the very wonderful and different ideas out there for using the very same thing….Wonderful blog and wonderful directions on making your clay dress………….
What a cute way to use this stencil!
Love what you did with the stencil….so cute!
The dress is adorable!!! You are SO clever! You have a real gift for working with clay.
Great use of the stencil. Love the clay ornament!
THANK YOU THANK YOU, EVERYONE! I so appreciate the great comments and support. Judy ❤
Hello my polymer QUEEN!!! Fantastic! Loving that tip about the plastic wrap and those little buttons OMG!!! Great tutorial Judy!!!
How completely original and unique! Love it!
simply fantastic Judy!
Loved your dress, it looks very nice, specially with the hearts!
I have one more question/comment the helmer glue is my fave but can’t find it. Where do you get it – Dee
Love the dress stencil and what you did with it. Thanks for having contest.
Beautiful ornament! I love the added touch of the blue buttons! 🙂
What a cool and unique way to use the stencil!! Beautiful! Thank you for sharing this with us!! I’ve never thought of using clay with stencils and don’t know why because I use my rubber stamps in clay!
I will have to try a stencil and clay. What a cute ornament.
wow what a great idea…perfect for a baby girl baby shower, a bridal shower or so much more
So glad this blog hop brought me your way. Polymer clay and stencils – who knew? Obviously not me. I am intrigued and inspired by your work. As someone once said ‘I’ll be back’.
Very special gift, Judy. Just adorable.
What a wonderful piece of art created with a great stencil, beautiful polymer clay, and the hands of one of my favorite artists! It’s truly a gem!
I’ve read all your comments.. and I can’t thank you enough. I love that most of you are seeing polymer clay and stencils for the first time. So glad I can share something new for you.
Dee: You can get Helmar from Amazon and I think Donna Downey carries it on her website.
Great idea using Sue’s stencils. I would love to play with them too. They are just so free and the dresses so cute. I would love to win a set. Thanks.
Sweet, sweet, sweet!!! Creative idea to combine polymer clay and stencils.
How cute is that. I love the detail on those buttons you made.
what a great idea to using the stencil with polymer clay. thanks for the inspiration
A pasta machine!! Never would have thought of that!
Thanks for the great tutorial. I will be giving this technique a try. The little ornament is so sweet!
Lot of work but oh so worth it. LOVE this way of extending the use of the stencil. So creative and pretty.
This is such a fantastic idea ! ! It opened my mind to all kinds of things to make to use on cards as well as scrapbook pages or for my journals…thank you
Wow! What a great idea to use clay with the stencil
What a sweet idea for the little girl in all of us. And so fun to play with clay, I can only imagine! I will have to give this one a go! TFS!
Aweeee! Love this. Make ornaments for the Christmas tree, as an added topper for a gift tag, so many uses – and I get to have fun and get messy. Wonderful.
AWESOME combo with clay & stencils!!….wonderful ornie inspiration!!
Pretty cool project with the clay – I have arthritis, so I think it would be pretty hard for me to attempt – but I can see making this out of paper! Thanks for sharing!
What a fantastic tutorial! Thank you for sharing.
Cheers
Gabriele
Caroline me ha enseñado a utilizar la plantilla con tela y ahora usted con arcilla. Gracias por su magnífico tutorial, ha sido muy interesante descubrir el abanico de posibilidades.
I so want to play with clay today (hey that rhymes!) all because of your post! So inspiring!
Wow talk about thinking outside the box really like this little dress
So many different ways to use the stencil. I would love to give it a try!
what a cool thing to do. that’s what I like about these hops, you get so many new ideas.