![]()
Welcome to the StencilGirl Blog Hop – Today I am playing with Terri Stigmiller’s stencil called Garden Swirl.

I just love curvy and soft edge designs. Flowers, hearts, spirals. I saw many designs in this one stencil. Of course, the flowers and spiral shapes.. but I also saw hearts.
I’ve decided to pull out my polymer clay again and target certain spots on the stencil to make thin embellishment to put on cards. Ready? Let’s go.
Click on any image to enlarge.
I’m working with Premo clay. Running it through the pasta machine as a very thin setting. If you are using a rolling pin, dedicated to clay, the make sure the clay is flattened to about 1/16th of an inch. You want these to be thin enough to glue on a card and not be too heavy. I’m targeting that corner design that looks like a heart. I also did the flowers and leaves.


Take the clay and lay it on the surface, non-stick or paper is preferable, and take the section of the stencil you want and put it on top of the clay. I am using an acrylic roller here. Push down so it indents into the clay. Pull up gently and you have your design imprinted in the clay. Use a dull knife to cut around the shape (think butter knife). Now, with some plastic wrap, lay it over the shape and smooth your finger around the edges. This softens the edges. Repeat with another shape. The next one was a flower.


Take a button or a rubber stamp and texture the clay flower (spray with water first for release). I made a small center for the flower. In the last picture, below, you can see the shapes I pulled from Terri’s stencil. So much fun.


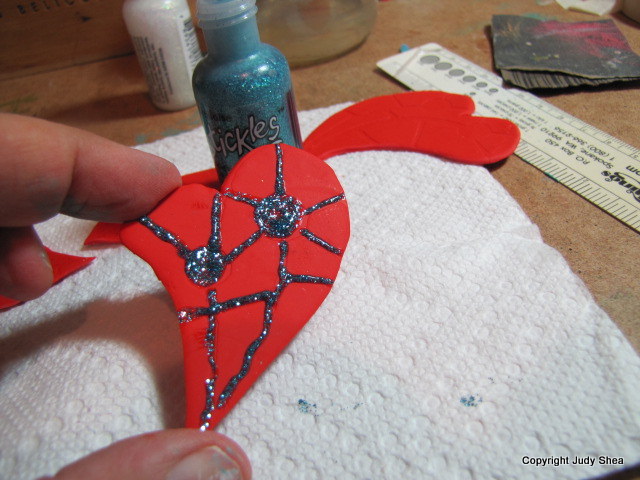
Time to bake in my clay oven for the time specified on the package. These are thin, so they won’t take more than 15 minutes. Once they are baked and cooled, it’s time to make them purdy. I took stickles glitter and drew into the creased lines of the heart and leave… or….


.. here I stained my other pieces with brown acrylic paint.


Time for a shine. For the glitter pieces, I used Diamond Glaze. For the stained pieces, I used my handy dandy Future Floor Wax. Let dry. As you can see with the last picture, they are pretty thin and flexible.


I took two tags and laid them down and made a binding with masking tape. Think greeting card. Covered the card on the outside with Ranger tissue paper, gluing with gel medium. Then I glazed with the Golden’s Patina Green glazing liquid, rubbing it in with a paper towel.


I wanted to tone down the background. I took a wash of titan buff acrylic paint and water and gave it a wash. Then sprayed with Dylusions, front and back.


I took my Krylon Gold Leafing Pen and went around the edges of the card and doodled all around.


Glued the clay embellishments on the front of the card. Inside the card, I glued in torn pages from a children’s book and washed that with titan buff and water to push the words in the background.


I wrote a message in a thick lettering style – “I Am Grateful 4 U”.


And, that’s it folks. Making your own handmade embellishments for your handmade greeting cards, just adds that special touch. I just love that you can use stencils in so many ways. Just one little section can create wonderful designs all by themselves.
Give-a-way alert: All comments left on the ENTIRE hop are eligible to be picked as the winning comment. Giveaway will close on Sunday, November 24th at 11:59 p.m. cst.
Please follow my art friends below. Can’t wait to see what they have all done.
StencilGirl Talk
Terri Stegmiller
Linda Kittmer
Kirsten Reed
Marjie Kemper
Janet Joehlin
Judy Shea (that’s me, next is Linda)
Linda Cain
Corrine Gilman
Leslie Tucker Jenison
Mary C. Nasser
Thank you so much for stopping by. You know how I feel about you. Loving all your comments.
Judy ♥ ♥ ♥
